- 1 Problem at hand
- 2 Background
- 3 Proposed Solution
- 3.1 Small parts
- 3.1.1 Color coding
- 3.1.2 Bin sizes and numbers
- 3.1.3 Bin Storage (Shelves for the bins)
- 3.1.4 Estimated Cost
- 3.1.5 Specific Selection
- 3.1.6 What to do with the old parts storage
- 3.2 Computer
- 3.3 Drinking Water
- 3.4 Cranks
- 3.5 Making space for these changes
- 3.6 Items we may not address
- 4 Resulting benefits
Problem at hand
We are taking a look at reorganizing the shop to provide better access to commonly used resources and more effective storage of used parts.
We need to give a home to the following things:
- Water cooler & bottles. Current location: At the front where there is often congestion, in the way.
- Pumps. Current location: At the front, in the way.
- Computer. New to the shop, so where can it go?
- Old inner-tubes/tubes to be sorted. We have storage for tubes once they are checked and sorted but nowhere “official” to put tubes that are being processed.
We would like to improve the storage of the following:
- Small Parts. The containers are deteriorating, we need to add more containers and we would like to have better grouping based on use on the bike (brake components, shifting components, etc.)
- Cranks. The three piece crank storage is problematic because it gets in the way of using our work bench. The cranks on the kick-stand hooks and the cranks in the bins (when pulled out) prevent people from reaching and using the bench space. This will be a particular problem for classes.
- Housing and Cables. There is no separation between brake and dérailleur housing and there is no sorting by size.
Background
See the page on dealing with small and medium parts .
Proposed Solution
Small parts
We can get new containers that are stackable/hanging with a place for labels, can be looked into and come in different colors. We would like to remove the white wood shelf (containing lubricants, etc.) and put the small parts storage in that space. This will free up the shelf that is currently holding the small parts (white metal shelf).

Color coding
Colors will be assigned used to distinguish between categories of parts.
Categories based on location on the bike:
- Brakes
- Cantilever
- Center-pull
- V-Brakes
- Mountain
- Road
- Cabling
- Brakes
- Shifting
- Drivetrain
- Bottom Bracket
- 3 piece
- Single piece
- Dérailleur
- Front Dérailleur
- Rear Dérailleur
- Shifters
- Grip Shifters
- Bottom Bracket
- Other
- General Hardware
- Suspension
- Accessories
- Seats
- Steering
- Headset
- Wheels
- Hubs
We can have a total of 6 different colors for the bins, but may realistically only be able to order 3 different colors, so we may need to combine a couple of categories or put more into the “Other” category. There is a minimum number of bins we can buy for any given color (24 bins).
To differentiate between category, we probably should not rely on bin color, so we should find a way to label bin colors ourselves. The color electrical tape used on the card catalogs seems pretty good and is simple.
To differentiate sub-categories, we can have different colored labels for each bin. We then can have a nice sign that will act as a legend to indicate what the color stands for.
Bin sizes and numbers
See the dealing with small parts page for details. A very rough initial estimate shows we may want as many as 150 bins. They could take up a shelf that is 4 feet wide and 7 feet tall. If this is too much space, then there are options to reduce the number of bins used and the amount of space used by the bins.
Bin Storage (Shelves for the bins)
We could keep our existing white shelf and maybe modify it to have more shelves that are not as tall. The end result could look something like the following (See the comparison between using shelves vs. hanging bins on the dealing with small parts page for rationale.):

Enhancements to the bin shelving
- Paint sections of the shelf to correspond to where colored bins go
- Attached component assemblies to go along with signs to show where parts go
- Ex. Brake assembly bolted to the shelf
Estimated Cost
- Bins: $250 + $50 shipping
- Louvered Wall Panel: $100 + $70 shipping
Specific Selection
Quantum Economy Recycled Shelf Bins
Bins
(example image)

| Model No | Outside Dimensions | Carton Qty. | Price Each | Order Qty | Cost |
| QSB101BR | 11 5/8"L x 4 1/8"W x 4"H | 36 | $1.12 | 72 (2 ctns) | $80.64 |
Dividers
(example image)

| Model No | For Bin Model No. | Carton Qty. | Price Each | Order Qty | Cost |
| DSB101 | QSB101 | 50 | $0.31 | 100 (2 ctns) | $31.00 |
Shelf space?
Space Needed:
- Add .5" space to each bin gives width of 4.625"/bin
- 4.625″ × 10 bins per row gives 46.25" needed for a row
- We have a 4 ft (48") wide shelf, so there is space
- Use 7 rows to fit 70 bins total (leaving 2 extra in the end)
Actions:
- Re-space existing rows on the shelf
- Add 2 additional rows for a total of 7 (I think there are 5 right now)
What to do with the old parts storage
Library catalogs
We want to keep the library catalogs since they are fairly sturdy and certainly useful to us. We can put generic nuts and bolts into them, and store them on top of the filing cabinets. We may need to clean out some stuff on the top of the cabinets. We also need to check whether the filing cabinets are able to support the extra weight of the library catalogs and their contents.
We will need to seal off the library catalogs if they are going to be used for nuts and bolts. That can be done by making new bottoms.
Plastic bins
We can consolidate the bins and see how intact they are or how broken down they are. If they are still good, we can also use them for sorting generic nuts and bolts. We may use the library catalog drawers for large general categories of rather unsorted hardware, and then the smaller plastic drawers for more carefully sorted hardware in more specific categories. Also, rare hardware will not need large drawers and common hardware will need larger drawers. If we don’t find a good use for the plastic bins, we can just give them away to somebody.
The plastic bins may be better than the card catalogs for holding hardware since they are sealed off, but each individual bin may be too small for how we want to use them.
We might also consider providing for “overflow” drawers in case we temporarily have excess amounts of a given part. One problem with the current arrangement is overstuffed drawers that don’t close, with nowhere else for the parts to go.
Computer
The computer can be put under the desk at the front, right above where we keep the toolboxes. There was nothing in the space except for an empty box and some spray paint cans, so it is now available to use.
This might require drilling a small hole for cable routing in the back of the surface of the desk — check to see if there is any pre-existing opening at the back first though.
Drinking Water
We are concerned that leaking water would damage the computer. Also, the computer monitor would likely go where the water is now. Additionally, there is no good spot to store the bottles. We propose making a stand to put between the work benches and the shelving/bins area.
Cranks
Storage for the single piece cranks and the three piece cranks can be done separately.
Single-piece cranks
We can make “trees” that are similar to post-card displays in stores that rotate. The cranks would insert into a holder and the holder would rotate about a central column. A prototype holder has been made from wheels and a stem bolt and it looks like it could have a decent capacity for cranks.
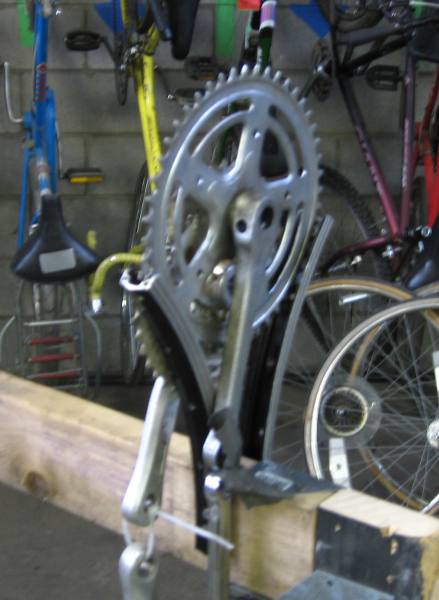
Three piece cranks
We can make a rack for storing cranks with chainrings attached. Matching sets should be paired and tied together. Cranks without chainrings can be stored in a box.
The rack will be constructed from 2×4 and cut-up aluminum 26" rims that are no good. I’ll upload a sketch if I get time to make one. We could use steel rims too, but the process will be more difficult. The rack construction will be rather labor intensive and may not be completed by March. We may have the rack be an on-going project that will be completed by the summer.

Cable and Housing
Change the current storage system with new storage that will be space efficient and help to sort parts. The new storage will be based on using PVC piping.
Large diameter PVC piping with a closed bottom and open top. The diameter is large enough to put your hand into. We can have three pipes of short, medium and long lengths. Parts of corresponding lengths will go into each pipe. We will build supports for the tubes so they can be free-standing in some manner (individually or more likely as a set)
We will have a set of pipes for:
- Brake Cable
- Brake Housing
- Dérailleur Cable
- Dérailleur Housing
Possible issues & solutions:
- People put short parts into the longer pipes
- Have a window at the bottom so we see if it is jammed with small segments
- Have an opening at the bottom so that smaller segments will fall out
These new tubes will not take much space. One good place we could put them would be with the stand that we will make for the drinking water.
Making space for these changes
In the process of finding homes for those items, the following may be displaced and will also need to find new homes:
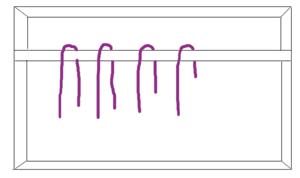
- Used Chains
- If we have a vertical space avail, we could use those wooden pieces (flat with reinforcing frames in the back) left from the prince party). Cutting off one “frame”, and attaching an extra length of wood (or anything long and skinny) we could make a panel to hang chains from. And that could go anywhere we have an open vertical space. (Wall, side of a cabinet, etc.) Attempting to draw:
- Contents of the white shelf (lubricants, etc.) The contents of the white wood shelf will go a couple of places:
- The books and manuals will go to the front of the shop with the rest of the books (we need book ends)
- The lubricants and cleaners, etc. will go onto the white metal shelf
- Anything that does not fit will get a new home or may be purged (like the box of random rags that is somehow different than our other box of random rags..)
Items we may not address
- Inner-tubes. This is a rather labor-intensive project that we can address at a later time.
- Pumps. They don’t take up much space and move around the shop quite a bit. They can be fit into wherever makes sense.
- Single-piece cranks.
Resulting benefits
Access to resources
- Better access to the large bench
- Get commonly used and commonly searched parts away from under bench storage.
- Clear the bench top area to place bike parts and tools while working
Moving the pumps reduces congestion at the front of the shop- Better location for cranks and housing
- Move them away from the bench so people don’t get into each other’s way
Effective storage
Better viewing, and storage for used parts
- Three-piece cranks
- Effective storage rack made from re-using old rims
- Small parts and general hardware
- Increased variety of small parts with specific places to go
- Flexible storage solution for small parts that can be adapted and maintained over time

