Starkers Tutorial
Table of Contents:
What is Starkers?:
Starkers is a completely naked theme, with no CSS, for wordpress users who want to make their own themes from scratch without having to struggle with changing CSS on already customized themes. These blank files practically give the designer full control of the appearance of the website.
Getting Started:
Keep in mind that you should have wordpress installed before this tutorial
[For instructions on installing wordpress, click here→
First:
1) Download starkers at elliotjaystocks.com/starkers
2) Once the zip file is loaded into the desktop, extract the folder from the zip file by dragging the folder alone into the desktop.
3) Now, go into the starkers folder that is compatible with your OS and you will see all the files that will make up you’re theme. You need to upload those into the backend of your wordpress site.

Uploading the files:
There is only on way to do this efficiently and that is to go to your c-panel and upload the files from there. You don’t want to upload it with the upload device on the backend of your wordpress site because you can only upload files one by one.
1) Login to your c-panel (cpanel can be accessed by typing in www.“yourdomainname”/cpanel)
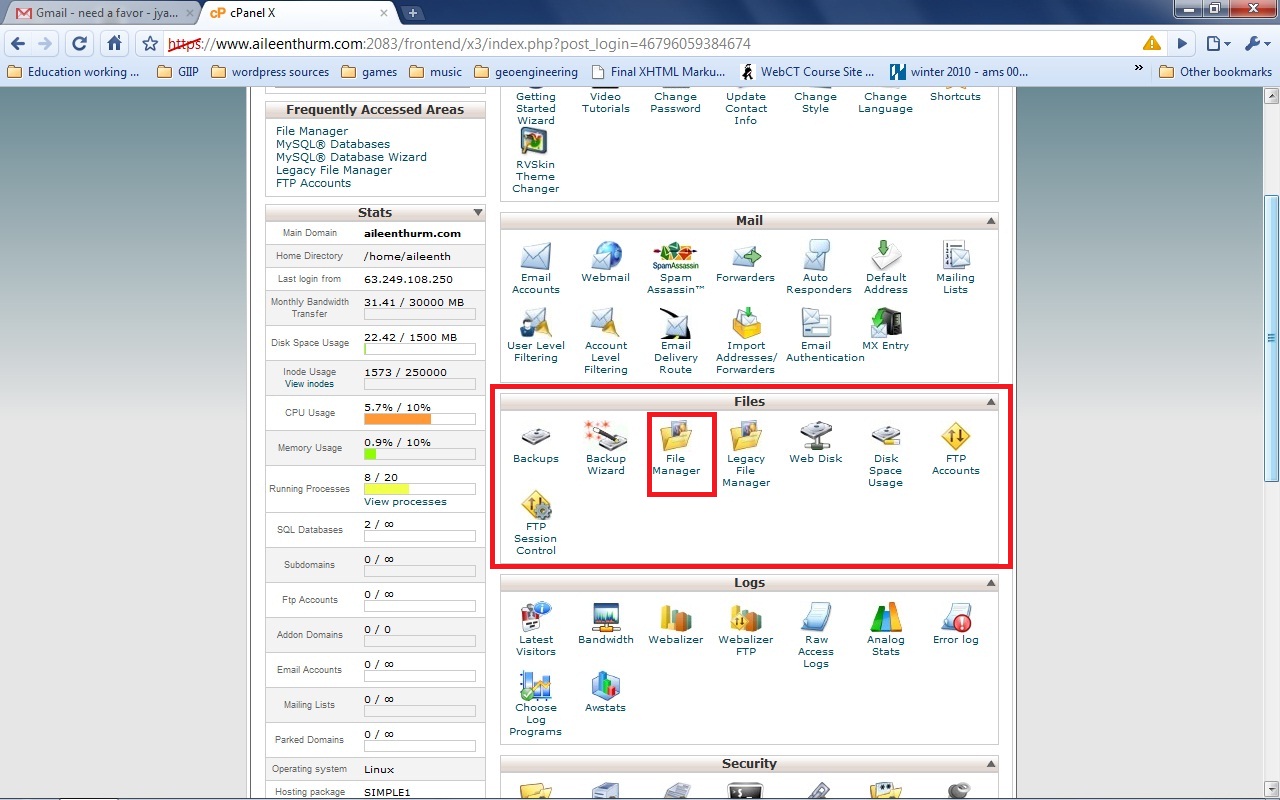
2) Once you’re in, find a box that says “files”
4) Then find an icon that says “file manager” and click on it
5) A box should appear that allows you to choose the directory you want to go to, click on the “web root directory”
6) This should take you to the wordpress folders (the folders you are using with your domain name).
Click on wp-content
7) Then click on the themes folder
*The folders in this folder are the different theme folders you’ve loaded for wordpress. These folders are full of php files and the style sheet that makeup a finished theme
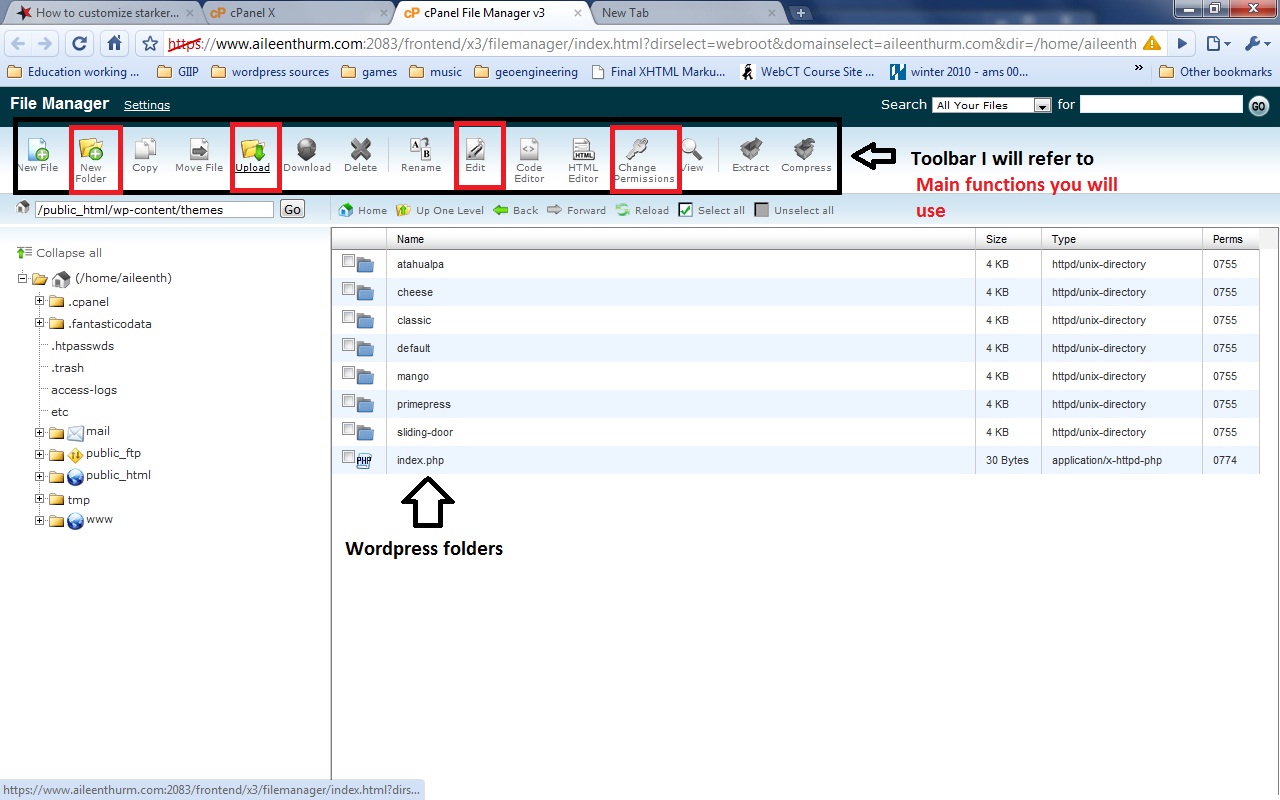
8) Since you’re going to make your own theme, make your own theme folder and name it whatever you want your theme to be called.
9) Now go into the new folder you made, click upload on the top tool bar, and start uploading all the starkers files from your desktop onto that folder. A more efficient way of doing this is to upload the .zip file into the folder, otherwise you will have to do each item separately
Activating the theme:
1) Login to the backend of your wordpress site by typing in your domain name (http://domainname.com) and then typing in /wp-login.php right after it.
The backend of the site is your Dashboard page where you will manage the website and make changes from. The sidebar is the main tool you will be using to navigate through the backend.
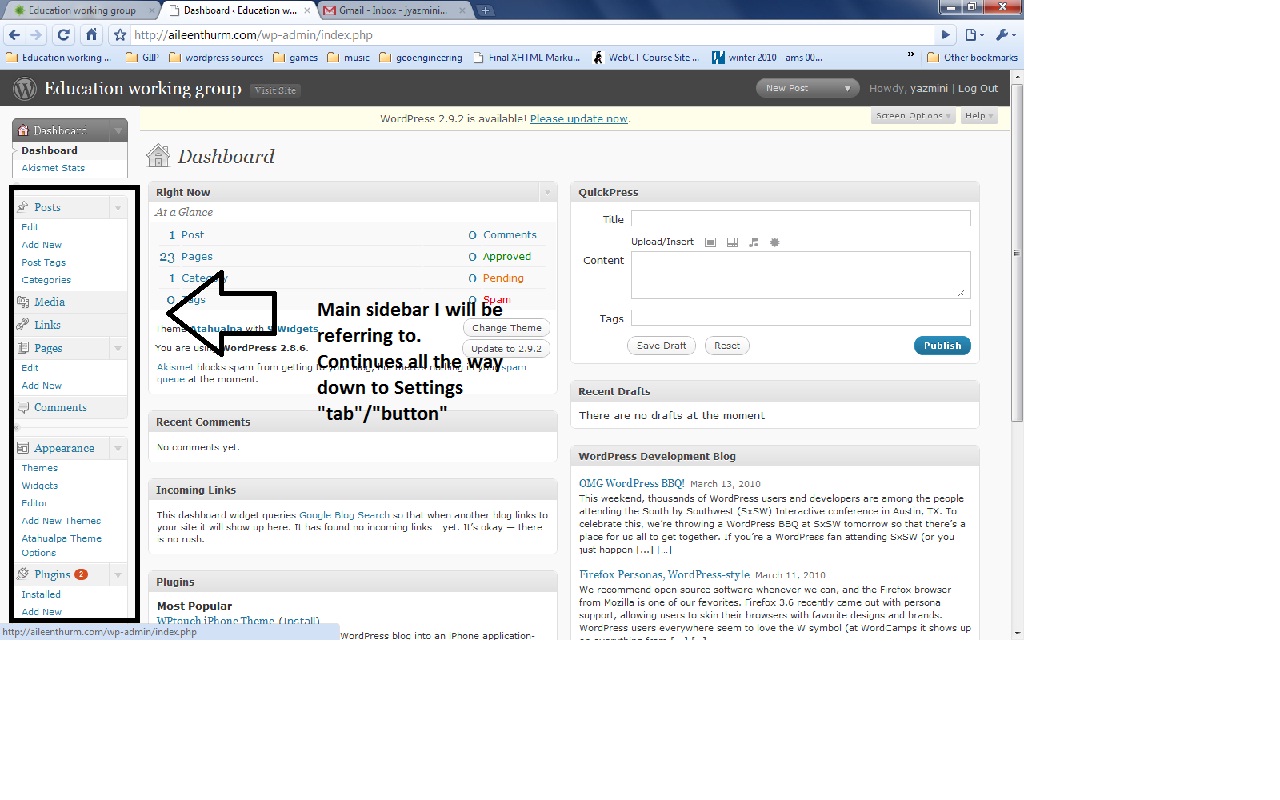
2) Activate your new site by clicking the Change Theme button on the At a Glance box on your Dashboard OR
Click on Appearance located on the left sidebar, then click on Themes
3) Once on Themes, You’ll see all the themes as large icons. Find your new theme and click the Activate on the bottom of the icon
Now when you go to the frontend of your site (the actual website), you’ll see a blank theme with all your old content on it.
Should look something like this: elliotjaystocks.com/starkers/demo
And you’re ready to get started!
Designing with starkers:
Overall designing instructions:
Now that all the Starkers files are in your theme folder, you can edit them and see the effects in your webpage.
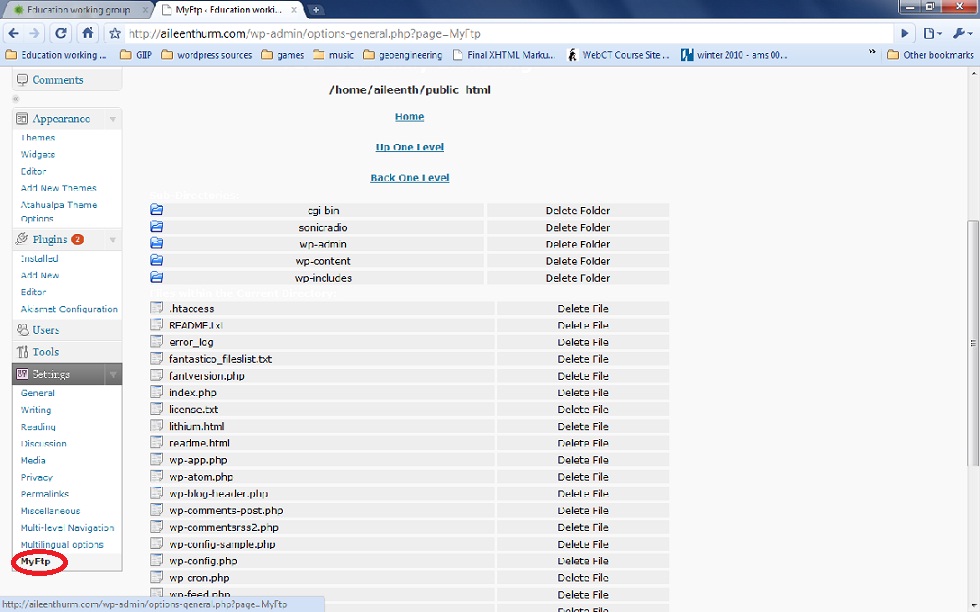
I will use the MyFtp plugin to edit the files. If you don’t have one, this is a very useful tool. Download here
You can also edit from the c-panel where you uploaded the theme files.
Before you start editing on MyFtp:
You have to change the privacy settings on your c-panel to edit the files through MyFtp
1) Your files should be uploaded right now, click the select all checkbox to change the settings on every file
2) Then click change permissions on the top toolbar
3) A box should pop-up with a list of all the files being modified and little checkboxes next to specific permissions.
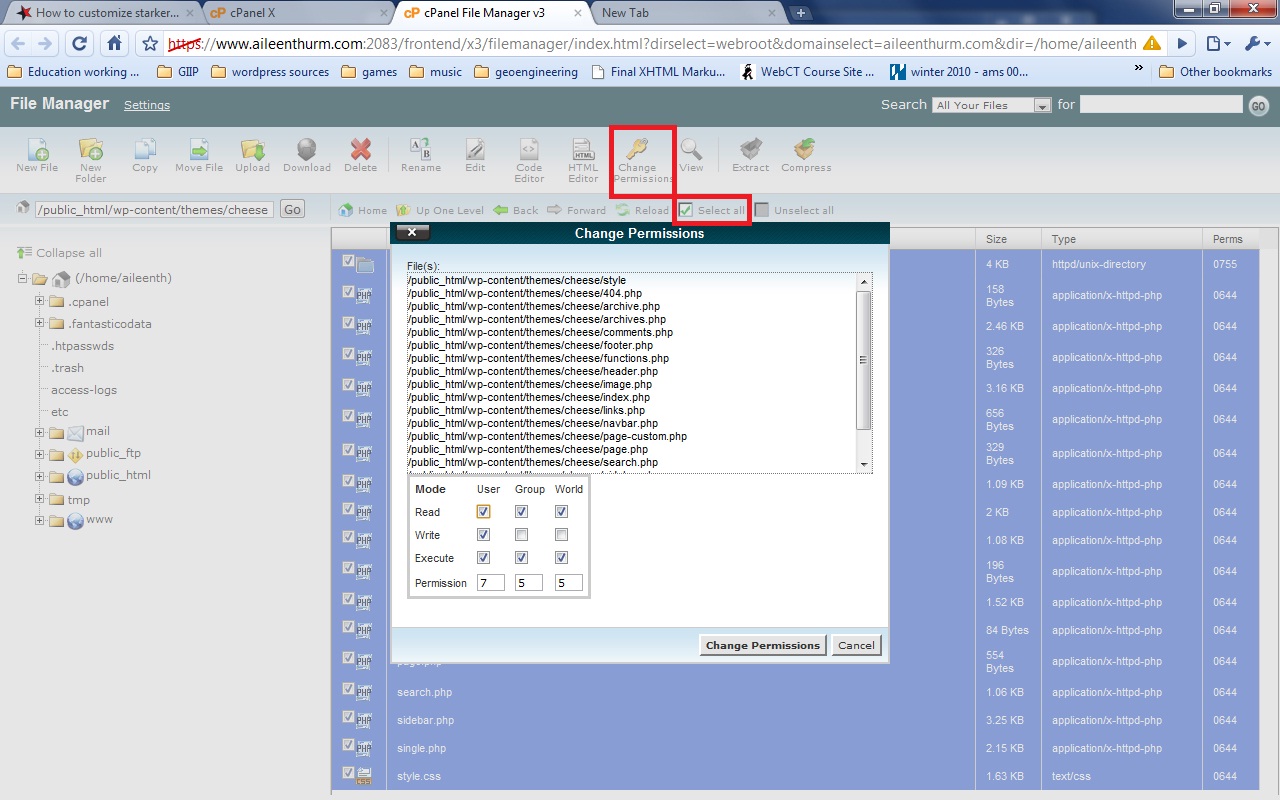
4) Check all three boxes under “User” so that you will be able to read, edit and execute the code in the files through MyFTP
5) Then under “group” and “world” you might just want to check the read and execute boxes to at least have some privacy for your files.
Now you start editing:
Using cpanel:
1) Just click on the file you want to edit
2) Then click on the edit icon on the toolbar
And go on from there =)
Using MyFTP:
1) Go to the MyFTP plugin under the Settings button on the sidebar.
2) Go to you theme folder
Wp-content >>> themes >>> Your new theme folder
For both MyFTP and Cpanel users:
Most customization will happen in the css file called style
Wp-content >>> themes >>> Your new theme folder >>> style.css
The html part of your code will be written in the php files.
Writing your own CSS code
Creating divs and classes
Divs and classes are call names you give to the elements of your website in the html code so that you can edit the elements individually in the css code. Divs and classes serve as identification tags that will be picked up by the css code.
The only difference between divs and classes are that divs dominate classes. If there is ever conflicting css code, the div css code will override whatever css code you have in the class that conflicts with the div.
Because Starkers is a naked site, it does not have divs and classes identified in the html code to classify the different elements of the website.
1) Go to the php file of the element you want edit and create divs and classes for each
I will illustrate this process by making a basic, fixed position website layout with a background image.
Header:
1) Go to the header.php file
2) You should start your div in the line before this php tag: <?php wp_head(); ?>
Explanation: The php code after this calls upon the things that will be visible in your site like the blog name, blog description, the link and the start of the body.
Start of the body: <body <?php body_class(); ?>>
Home link: <h1><a href="<?php echo get_option('home'); ?>/">
Blog name: <?php bloginfo('name');?></a></h1>
Blog description: <p><?php bloginfo('description'); ?></p>
You want to include all of these elements in the editable header so end your div after the blog description php code.
At the end it should look like this:
</head>
*<div id= "header">*

	<?php wp_head(); ?>

	<body <?php body_class(); ?>>
              <h1><a href="<?php echo get_option('home'); ?>/"><?php bloginfo('name'); ?></a></h1>
		<p><?php bloginfo('description'); ?></p>
*</div>*
The same applies for the footer and sidebar:
Footer: Footer.php:
*<div id= "footer">*
		<!-- If you'd like to support WordPress, having the "powered by" link somewhere on your blog is the best way; it's our only promotion or advertising. -->
		<p><?php bloginfo('name'); ?> is proudly powered by GIIP Enterprises
 <a href="<?php bloginfo('rss2_url'); ?>">Entries (RSS)</a> <a href="<?php bloginfo('comments_rss2_url'); ?>">Comments (RSS)</a>. <!-- <?php echo get_num_queries(); ?> queries. <?php timer_stop(1); ?> seconds. --></p>

		<?php wp_footer(); ?>

                                  * </div> *
	</body>

</html>
Sidebar: sidebar.php
*<div id= "sidebar">*
		<ul>
			<?php 	/* Widgetized sidebar, if you have the plugin installed. */
					if ( !function_exists('dynamic_sidebar') || !dynamic_sidebar() ) : ?>
			<li>
				<?php get_search_form(); ?>
			</li>
php code for different widgets and elements on the sidebar continues…
Go all the way down and end the div:
<li><a href="http://wordpress.org/" title="Powered by WordPress, state-of-the-art semantic personal
publishing platform.">WordPress</a></li>
			<?php wp_meta(); ?>
					</ul>
				</li>
			<?php } ?>

			<?php endif; ?>
		</ul>
*</div>*
Main content:
Making a div for the main content is different from any other one. Since the main content does not have its own php file in the theme, (you would need to know php to make one) and it does encompass almost the entire website, we have to start the div in the header.php file and end it in the footer.php file.
The main content will include the posts and comments on the site.
1) Go to the header.php file
2) Put the container div after the end div tag for the header
<?php wp_head(); ?>

	<body <?php body_class(); ?>>
              <h1><a href="<?php echo get_option('home'); ?>/"><?php bloginfo('name'); ?></a></h1>
		<p><?php bloginfo('description'); ?></p>
<?php if (function_exists('pixopoint_menu')) {pixopoint_menu();} ?>

</div>

*<div id= "content">*
3) Next, go to footer.php
4) Put the end tag before the start of the footer div tag:
*</div>*
<div id= "footer">
		<!-- If you'd like to support WordPress, having the "powered by" link somewhere on your blog is the best way; it's our only promotion or advertising. -->
		<p><?php bloginfo('name'); ?> is proudly powered by GIIP Enterprises
 <a href="<?php bloginfo('rss2_url'); ?>">Entries (RSS)</a> <a href="<?php bloginfo('comments_rss2_url'); ?>">Comments (RSS)</a>. <!-- <?php echo get_num_queries(); ?> queries. <?php timer_stop(1); ?> seconds. --></p>
You can do the same for the rest of the elements in your site like the comments (comments.php), posts (page.php), search bar (search.php) etc. Since the posts and comments also fall under the main content, you could create classes for them instead. It’s all up to the designer.
Now you can design the website on the style.css file by calling on the divs you just made.
Example:
CSS code:
/div for the body was already created in original Starkers php code/
body{
background-image: url(“http://static4.grsites.com/archive/textures/comp/comp022.gif”);
background-repeat: repeat;
font-family: Arial, Helvetica, sans-serif;
font-size: 71.2%;
line-height: 1.5;
margin: 10px 0;
padding: 0;
height: 9in;
width: 12 in;
text-align: center;
}
/-—————————————————————-header————————————————-/
#header{
position: fixed;
height: 10%;
background-color: yellow;
width: 85%;
top: 5%;
bottom: auto;
right: 5%;
left: 5%;
}
/-———————————————-navigation bar——————————————————/
/Plugin See: Using plugins to design your page/
/-——————————————-sidebar——————————————————————/
#sidebar{
position: fixed;
background-color: red;
width: 15em;
height: auto;
top: 15%;
right: auto;
left: 5%;
bottom: 100px;
}
/-—————————————————-main content——————————————————/
#content{
position: fixed;
background-color: blue;
width: auto;
height: auto;
top: 15%;
right: 10%;
left: 15em;
bottom: 100px;
text-align: center;
/-——————————————————footer———————————————————-/
#footer{
background-color: pink;
width: 85%;
height: 100px;
top: auto;
bottom: 5%;
right: 5%;
left: 5%;
position: fixed;
}
Website:

This is just the most basic type of website for the tutorial.
For more help with CSS go to: w3schools.com , css-tricks.com
For tips on design: sixrevisions.com , www.webdesign.org/web-design-basics/tem...
And for help on positioning (the hardest part) go to: www.w3.org/TR/CSS2/box.html
Using plugins to design your page
Choosing and installing a plugin:
1) Go to the plugin section on the sidebar and scroll down to the “add new” link
2) Put in the type of plugin you need on the search bar
3) Choose a plugin from the search results on the plugin box
4) Click the install link nest to the plugin description
5) Activate the plugin
Designing
Example: Multi-level Navigation Bar
Incorporate it into your webpage
1) Write in the php code in the header.php file wherever you want your navigation bar to go.
PHP Code for Multilevel Navigation toolbar:
<?php if (function_exists(‘pixopoint_menu’)) {pixopoint_menu();} ?>
(Each plugin has the correct php code on their installation instructions)
To customize the appearance
1) Go to the settings tab on the sidebar, if you scroll down you should find the name of the plugin you just installed
2) Click on the name of your plugin
3) This should direct you to a page with four tabs called Home, Appearance, Main Contents and Settings. Click on the Appearance tab
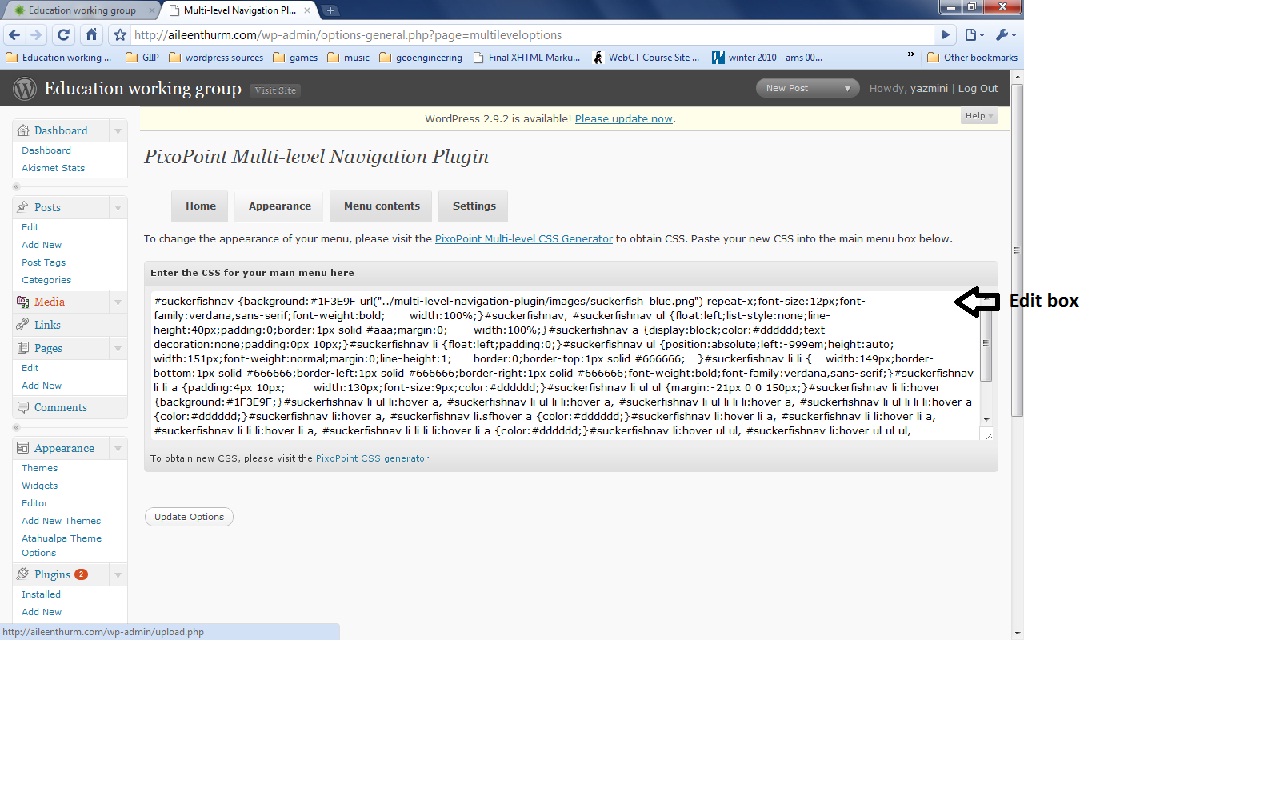
4) There should be CSS inside the editing box already,
If you are comfortable with CSS, you should edit the navigation bar directly by changing the existing CSS.
If you want are not, you should use the CSS generator provided in the plugin site (link to the site above the edit box) to generate new CSS and paste it on the edit box.

