Beginners Guide to Privacy and Anonymity
Guide is Available via Tor:
7lvd7fa5yfbdqaii.onion/opsec/anonymity-...
Intro
The goal is to bring together enough information in one document for a beginner to get started. Visiting countless sites, and combing the internet for information can make it obvious your desire to obtain anonymity, and lead to errors, due to conflicting information. Every effort has been made to make this document accurate. This guide is image heavy so it may take some time to load via Tor.
Some general sources/Big Thanks
For more general guides checkout:
EFF Surveillance Self-Defense project – ssd.eff.org
Riseup.net Security Guide – https://help.riseup.net/en/security
Security in a box – securityinabox.org
TAILS Documentation – tails.boum.org/doc/index.en.html – for those looking for a solid starting place TAILS OS is a great choice.
thanks
securityinabox.org
Deepdotweb.com
EFF and EPIC
riseup.net
For educational purposes.
Not legal advice or call to action.
If you would like to be able to edit, join wespace.riseup.net and request to join the group.
Table of Contents
- 1 Intro
- 2 Some general sources/Big Thanks
- 3 Technical Information
- 3.1 Strong Passwords
- 3.2 Internet Connectivity
- 3.2.1 Firewall
- 3.2.2 Changing MAC Address
- 3.2.3 Intrustion Detection
- 3.2.4 Disk Encryption
- 3.2.5 Browsers
- 3.2.6 Router Configuration
- 3.2.7 Anonymity Networking
- 3.2.8 VPN
- 3.2.9 Proxy Chains
- 3.3 Operating Systems
- 3.3.1 Flash Firmware
- 3.3.2 Enabling a BIOS boot password
- 3.3.3 USB Bootable Operating Systems:
- 3.3.4 Linux (image files can be found at http://distrowatch.org)
- 3.4 Secure Data-Wiping Linux
- 3.5 Physical Destruction
- 3.6 Cold-Boot Attack
- 3.7 Basic Communications
- 3.8 GNUPG/PGP Basics
- 3.9 Validating Files with MD5 or SHA1:
Technical Information
Strong Passwords
It’s difficult to remember many passwords. First off it’s good to select a strong password manager. Keepassx (https://www.keepassx.org/) is cross-platform, and has good security features, like encryption by password and using a keyfile. It also allows you to generate strong passwords, so if you’re not worried about memorization it’s good practice to let Keepassx generate secure random passwords.
It’s best not to use services that store your passwords in the cloud. If you need you can back up your encrypted password database, on a secure server, in an encrypted directory, and store your keyfile in a separate location.
Passwords for encryption and critical access should be prioritized. Even a long randomized password may not be a secure enough method. EFF recommends you try the diceware method, or basically randomly chain a number of words selected from a word list based on dice roles. Full details are available here: – world.std.com/~reinhold/diceware.html
Although it’s an annoyance, passwords are the ever present key to what matters most to you.
Internet Connectivity
No service provider should be presumed to completely protect your privacy. Even if your VPN/Proxy or other ISP promises no logs, or identifiable information, time and time again information has been collected and used against those seeking anonymity. Open-Source technologies where you are able to examine source, yet trust is still ultimately placed in the hands of developers, are better than trusting a Government of other entity with your security.
Consider reading the Terms of Service any time you sign up for a service or install something.
Also remember that the times you use technology can be used to build a profile of your location for identification. Consider changing up your times of connectivity. On forums, chat and other services, it may be worthwhile to disable the notification that outwardly displays when you are on line or select invisible mode when applicable.
Firewall
UFW (Uncomplicated Firewall) is a great general firewall for linuux
- sudo apt-get install ufw
- sudo ufw enable
- sudo ufw default deny incoming
as some malware may utilize outgoing traffic, like encrypted udp, it may be worthwhile to limit outgoing ports
- sudo ufw default deny outgoing
it may be better to specifically allow/deny the specific ports of concern.
- sudo ufw allow port/tcp
- sudo ufw allow port/udp
Then when you’re done check the status
sudo ufw status
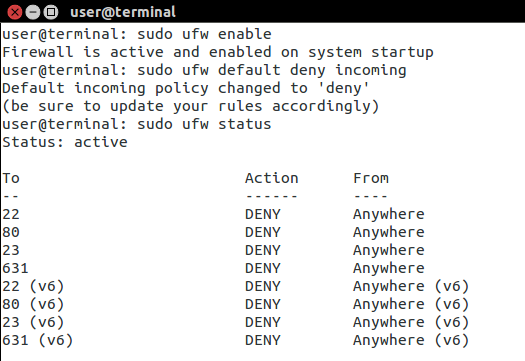
you can see I’ve blocked some specific ports in this example
For more advanced configuration visit: https://help.ubuntu.com/community/UFW
Changing MAC Address
section in progress
A MAC Address is a hardware specific identifier for you network interface. In some cases it may be useful to change your mac address to avoid detection.
Arch Linux Guide: wiki.archlinux.org/index.php/MAC_addres...
sudo apt-get install macchanger
for a gui
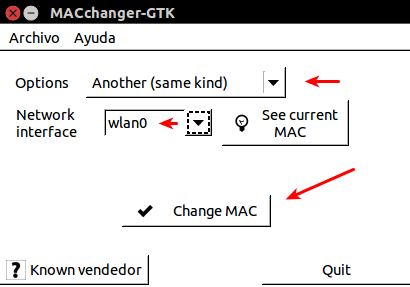
sudo apt-get install macchange-gtk
With macchanger-gtk
Check your current mac addresses for future reference
macchanger eth0
macchanger wlan0
for a random macaddress
sudo ifconfig wlan0 down
sudo macchanger -r wlan0
this will change the mac address to a random value
macchanger -e wlan0
will change the mac address but keep it as the same vendor. This can be useful if you’re spoofing your address but you don’t want it obviously coming from a device not on the network.
sudo macchanger -A wlan0
this will change the devices MAC to a random MAC of any kind, regardless of the original device.
sudo macchanger —mac=XX:XX:XX:XX:XX:XX interface
will change to a specific mac address of your choice
You may want to write a script to start automatically on network manager start, and network manager shut down.
sudo nano /etc/init/macchanger.conf
description     "change mac addresses"

start on starting network-manager

pre-start script
        /usr/bin/macchanger -A wlan0
        /usr/bin/macchanger -A eth0
        /usr/bin/macchanger -A wmaster0
        /usr/bin/macchanger -A pan0
        #/usr/bin/logger wlan0 `/usr/bin/macchanger -s wlan0`
        #/usr/bin/logger eth0 `/usr/bin/macchanger -s eth0`
end script
you can switch out -A for -r or whatever other configuration you might want.
sudo nano /etc/network/if-post-down.d/random-mac
#!/bin/sh

MACCHANGER=/usr/bin/macchanger

[ "$IFACE" != "lo" ] || exit 0

# Bring down interface (for wireless cards that are up to scan for networks), change MAC address to a random vendor address, bring up the interface
/sbin/ifconfig "$IFACE" down
macchanger -A "$IFACE"
- sudo chmod +x /etc/network/if-post-down.d/random-mac
- sudo service network-manager restart
Intrustion Detection
The basic premise is monitoring the system for unusual activity. First is to keep an eye on the logs, and the next step is to consider an IDS like snort. There’s a learning curve, but here are some useful tools, that with some research can increase security especially if you allow others to access the system.
- logwatch
- Open Source SECurity
You may want to get yourself acquainted with some of the common security tools available. Here’s a good list, definitely nmap, tcpdump, netcat and wireshark are useful.
Disk Encryption
On first install of a linux operating system you should be prompted to create an encrypted LVM partition, and encrypt your home folder. This is a good start. For further security there is veracrypt.
Veracrypt is a fork of Truecrypt that is better at patching vulnerabilities. I see a lot of tutorials touting Truecrypt, and it’s in most package managers. However, you should download Veracrypt.
Download: veracrypt.codeplex.com/releases/view/56...
Here’s a good beginners tutorial for Veracrypt
veracrypt.codeplex.com/wikipage?title=B...
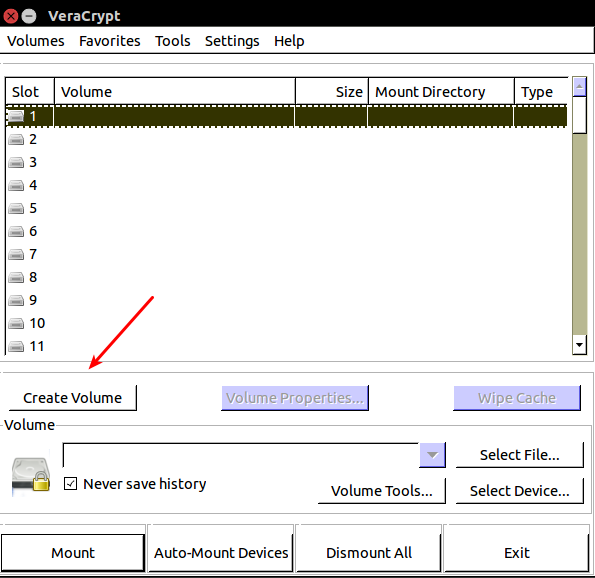
How to create a hidden encrypted volume with Veracrypt
Select Create Volume
Select Create an Encrypted File Container

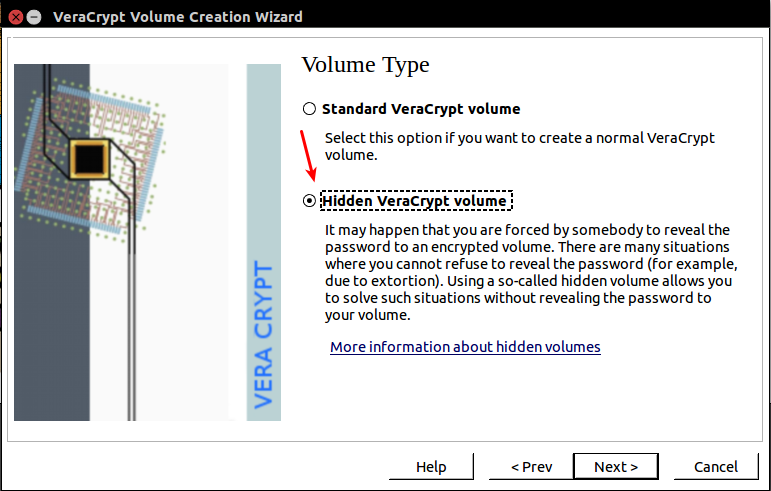
Select Hidden Veracrypt volume
chose volume location and select never save history
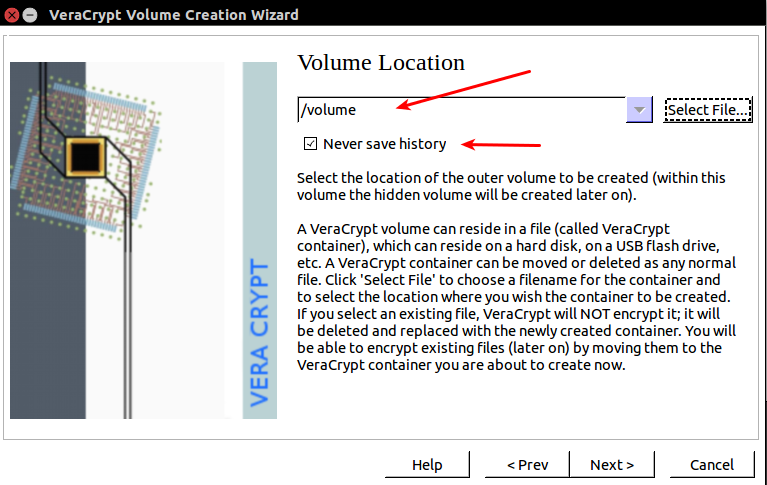
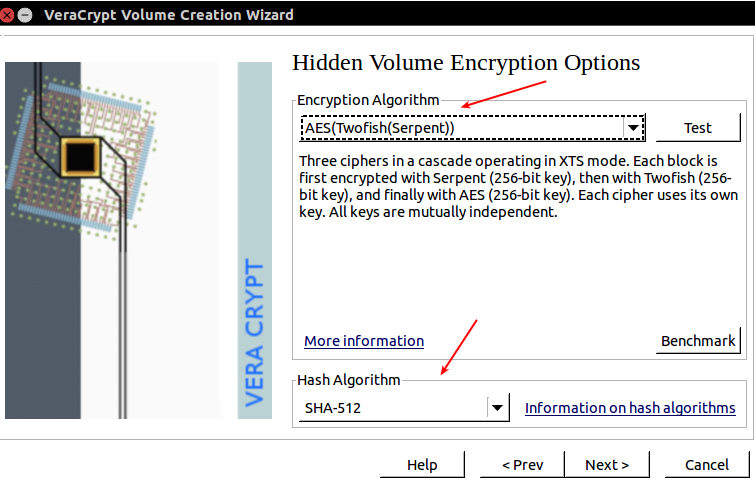
Select your encryption algorithm, AES is fine, but you may chose more secure
Select Hash Algorithm, SHA-512 is sufficient

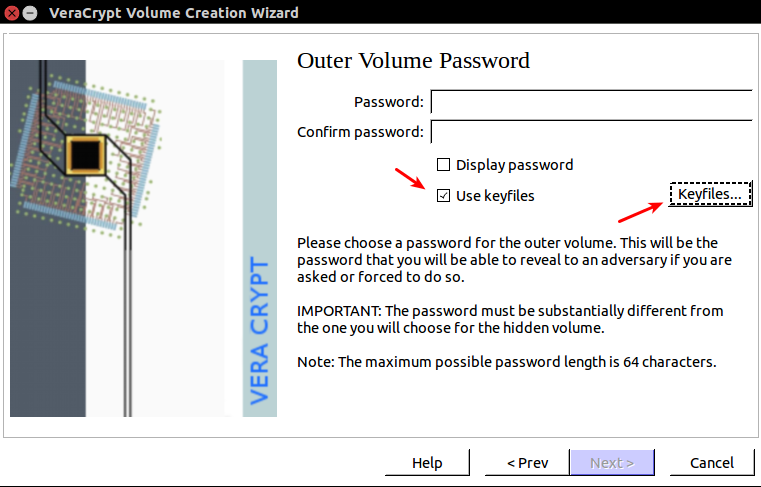
Select Use Key files and click the key files box… optional
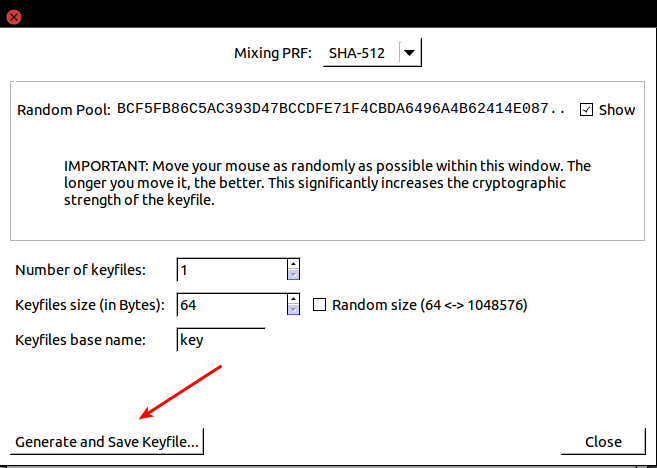
Generate save the new key.
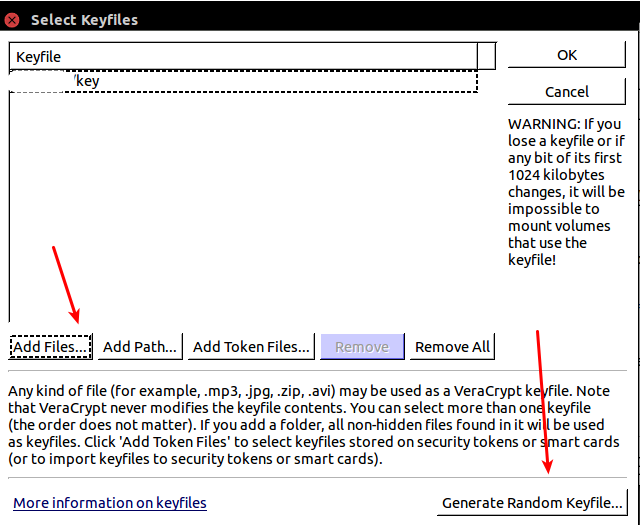
Click add files and add the key
Click Generate Random Keyfile box if you want another key
You may also use existing keys
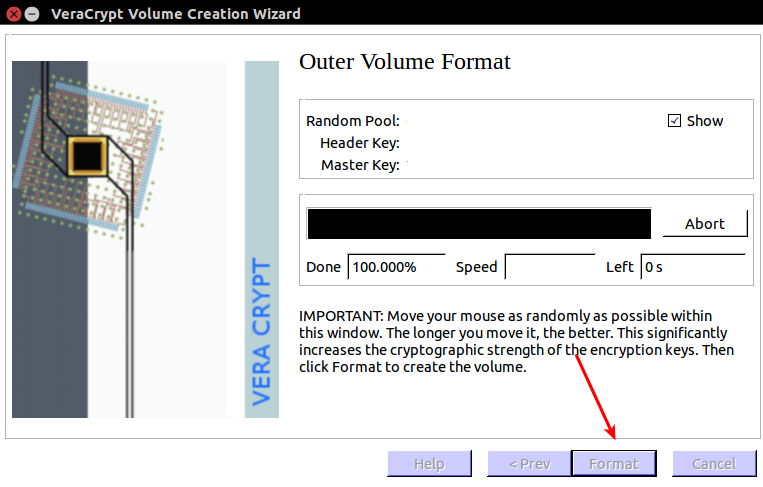
Click format to create the volume that will be visible
Now it’s recommended to load this volume with contents that appear sensitive
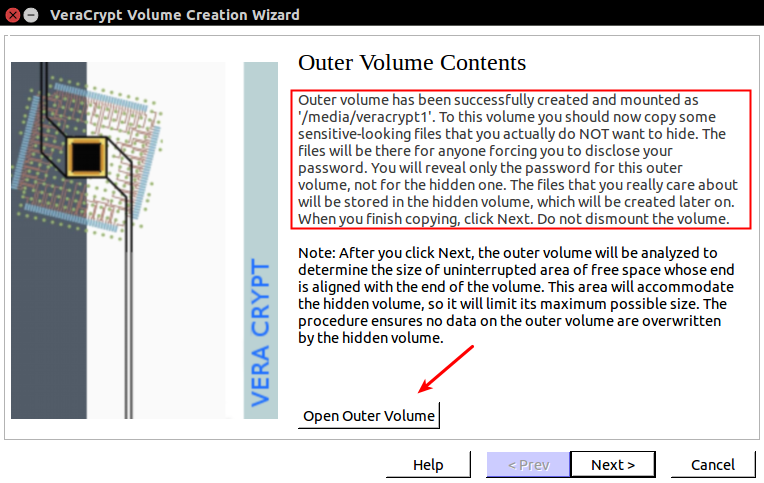
You will follow the same steps, remember this is the hidden volume consider it’s security most important.
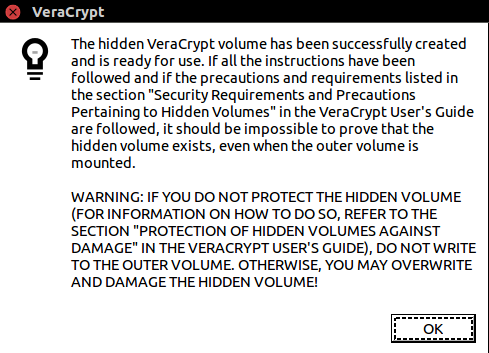
When complete you will see this warning, read it carefully.
Browsers
Tor Browser
Download at: torproject.org
All Tor network addresses will be followed with .onion, not .com. It is far more secure browsing .onion services.
In depth explanation of Tor by developer arma: media.torproject.org/video/tor-internet...
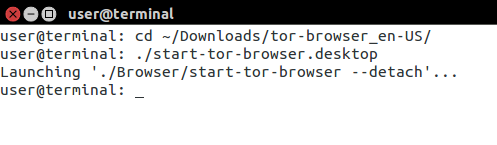
Once you’ve download tor browser, expand the zipped file. Then
cd tordirectory
./start-tor-browser.desktop
forbidding javascript and other elements can make web browsing less convenient, but by allowing more elements you open yourself to potential vulnerabilities. It’s best to find the best possible security setting you can withstand while the web browsing experience is still functional.
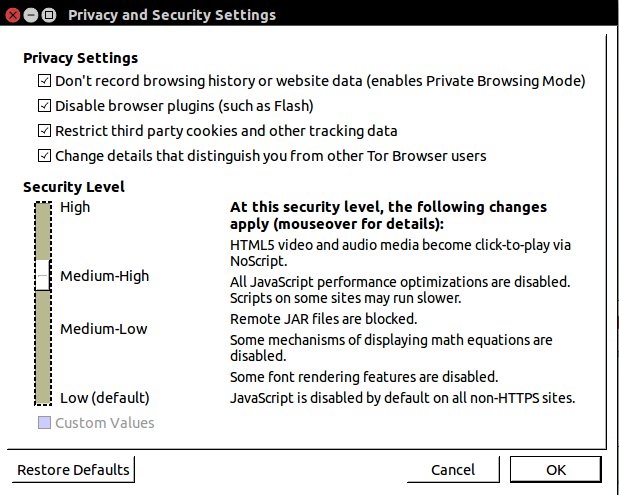
Configuring Security Settings
Privacy and security settings can be easily configured. Click on the Onion in the top left.
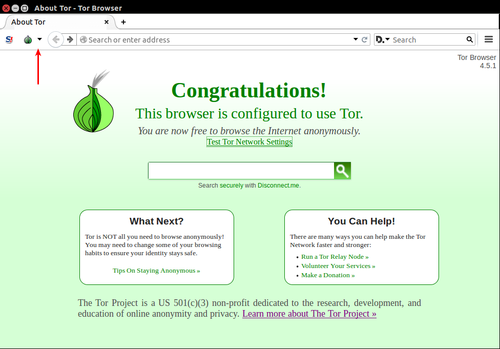
select “Privacy and Security Settings” Adjust the slider to your desired level of security.
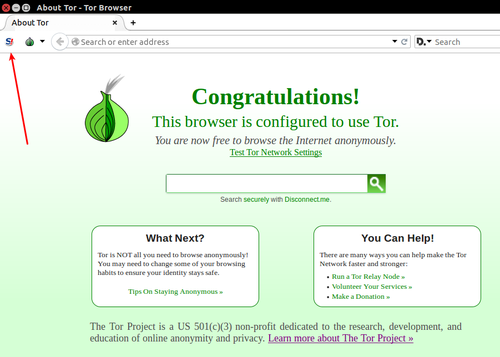
Noscript basics
Depending on your security level selected in Tor, Noscript may not provide any advantage. That main advantage of Noscript is it’s easier to tailor allowing on specific sites, or for specific elements on the fly. Click the S in the Top Left next to the Tor Onion symbol and select forbid scripts globally. You should see a red line across the S. If you allow specific sites, you should check that the red line is there for those you do not allow. Allowing only specific sites may create a fingerprint of your activity. There are some advanced settings under options worth taking a look at.
Tor bridge
in some cases if Tor is blocked or you wish to conceal the use of Tor a bridge can be configured. This makes it more difficult for an ISP to detect Tor. Bridges can help avoid censorship, and if your ISP Blocks Tor Traffic it is much more difficult to detect the nature of the traffic unless deep packet inspection is employed. It’s one of those things that since it’s there, might as well set it up as a per-cautionary measure and see if your connection is still, reliable and fast enough for your standards.
- Click Open Settings on the Pop-up Connection Box

- Click configure
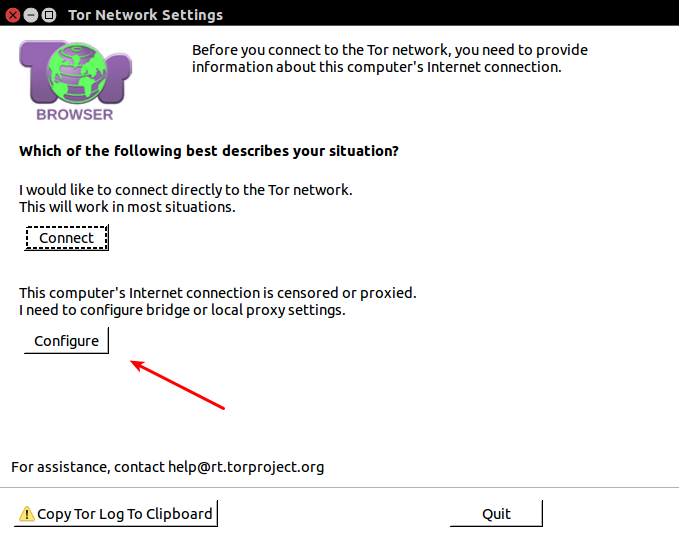
- Select Yes to ISP Censors or Blocks
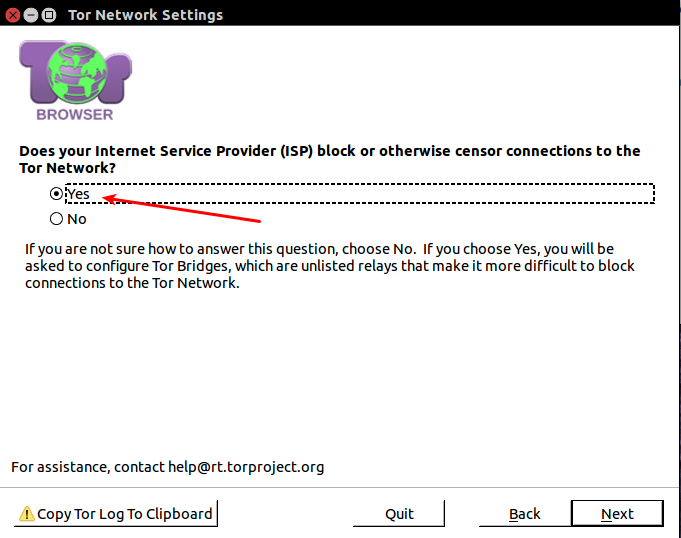
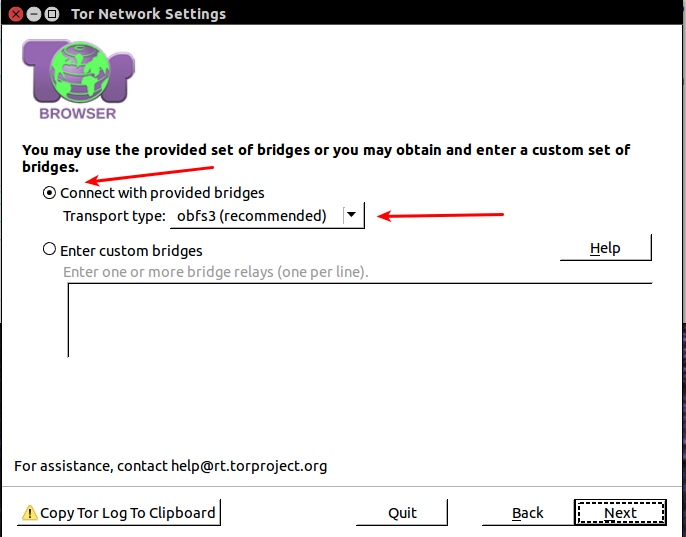
- obfs3 is fine, see below for information on other options.
- Most likely just skip use a local proxy
- Click connect

Optionally if Tor is already started you can
- click the onoin icon in the top left of the browser and select
- Open Network Settings
- check My ISP Blocks Connections and hit OK.
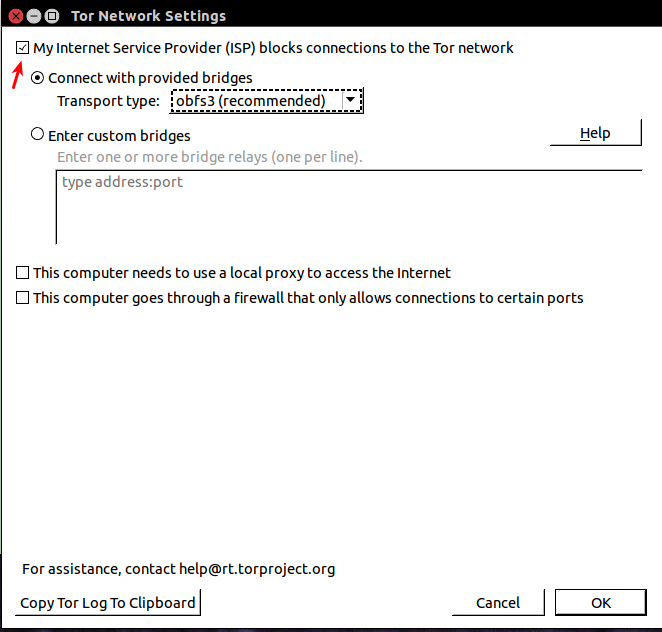
- use obfs 3 which is recommended, see next section on other types.
Pluggable Transports
Pluggable Transports are extensions to Tor which utilize it’s pluggable transport API. These are more advanced ways to disguise traffic flow, for instance making it appear as skype traffic or utilizing a flash proxy. Many are now included in the Bridge Option Menu, so this is a good resource to learn more about the specifics. Some may require custom installation.
www.torproject.org/docs/pluggable-trans...
Firefox
If you need to use another browser Firefox is preferred. Here are some configuration settings and extensions that can be helpful.
Optional Configuration:
In the URL Bar enter: about:config

- geo.enabled = false
- geo.wifi.uri =leave blank
- network.http.accept.default = text/html,application/xhtml+xml,application/xml;q=0.9,/;q=0.8
- network.http.use-cache = false
- network.http.keep-alive.timeout = 600
- network.http.max-persistent-connections-per-proxy = 16
- network.proxy.socks_remote_dns = true
- network.cookie.lifetimePolicy = 2
- network.http.sendRefererHeader = 0
- network.http.sendSecureXSiteReferrer = false
- network.protocol-handler.external = false #set the default and all the sub-settings to false
- network.protocol-handler.warn-external = true #set the default and all the sub-settings to true
- network.http.pipelining = true
- network.http.pipelining.maxrequests = 8
- network.http.proxy.keep-alive = true
- network.http.proxy.pipelining = true
- network.prefetch-next = false
- browser.cache.disk.enable = false
- browser.cache.offline.enable = false
- browser.sessionstore.privacy_level = 2
- browser.sessionhistory.max_entries = 2
- browser.display.use_document_fonts = 0
- intl.charsetmenu.browser.cache = ISO-8859-9, windows-1252, windows-1251, ISO-8859-1, UTF-8
- dom.storage.enabled = false
- extensions.blocklist.enabled = false
Other useful options:
- Disable all plugins: tools → addons → plugins
- Disable all live bookmarks: bookmarks → bookmarks toolbar → R/click latest headlines → delete
- Disable all updates: tools → options → advanced → update
- Enable ‘do not track’ feature: tools → options → privacy
- Enable private browsing, configure to remember nothing & disable 3rd party cookies: tools → options → privacy
Useful plugins:
it’s best to keep plugins at a minimum but here are some to consider
- HTTPS Everywhere – www.eff.org/https-everywhere
- Privacy Badger – www.eff.org/privacybadger
- Close n forget – addons.mozilla.org/en-us/firefox/addon/...
- ublock – github.com/chrisaljoudi/uBlock#getting-...
- Modify Headers – addons.mozilla.org/en-us/firefox/addon/...
- NoScript – addons.mozilla.org/en-us/firefox/addon/...
- RefControl – addons.mozilla.org/en-us/firefox/addon/...
- User Agent Switcher – addons.mozilla.org/en-us/firefox/addon/...
- Adblock plus – addons.mozilla.org/en-us/firefox/addon/...
You may consider visiting ip-check.info to see what data your browser is sending.
Router Configuration
It’s recommended to get a router compatible with an open source firmware. The two major recommended firmwares are Tomato and dd-wrt. In some cases Tor, or a vpn can be run directly on the router, and this can be useful if you find yourself forgetting at times to enable your desired connection. A backup router only used for specific connections may also be useful to swap in and out when secure connection is needed.. For the crafty, a Raspberry Pi can be configured as a local device to route connections through.
Installation is device specific navigate to either the Tomato or dd-wrt site for more information.
Tomato
tomatousb.org
Tor: tomatousb.org/forum/t-644375/tor-relay-... (may not work for all versions)
dd-wrt
www.dd-wrt.com/site/support/router-data...
Tor: do your own research
Raspberry Pi
raspberrypihq.com/how-to-turn-a-raspber...
makezine.com/projects/browse-anonymousl...
Anonymity Networking
Tor
The stand alone Tor daemon can be be found in the Ubuntu/Debian/Arch package manager.
sudo apt-get install tor
sudo pacman -S tor
However, you may wish to visit:
www.torproject.org/docs/debian.html.en and add their PPA to get the latest version.
You can use Tor as a socks proxy once the service is started, either with the browser bundle or Tor daemon.
Navigate to the Network Settings, and Proxy section of the desired application.
Select Socks 4 Proxy and enter 127.0.0.1 port 9050.
This will route desired connections through Tor. TAILS automatically routes all connections through Tor.
i2p
Alternative to Tor, not as widely used since it requires some more dependencies and not as simple setup. i2p addresses always display as .i2p
Unlike tor i2p is a self contained network, it does not function as a proxy with traditional exit nodes. It is generally used to browse with the network of what are called eepsites.
Ubuntu/Debian based systems
- follow guide to add i2p to package list
- for ubuntu: sudo apt-add-repository ppa:i2p-maintainers/i2p
- for debian: geti2p.net/en/download/debian
- other see, and download necessary java files: geti2p.net/en/download
- sudo apt-get update
- sudo apt-get install i2p
starting i2p in terminal:
do not run as root or use sudo
- i2p router start
If you have issue connecting to .i2p addresses check configuration by visiting: localhost:7657/confignet
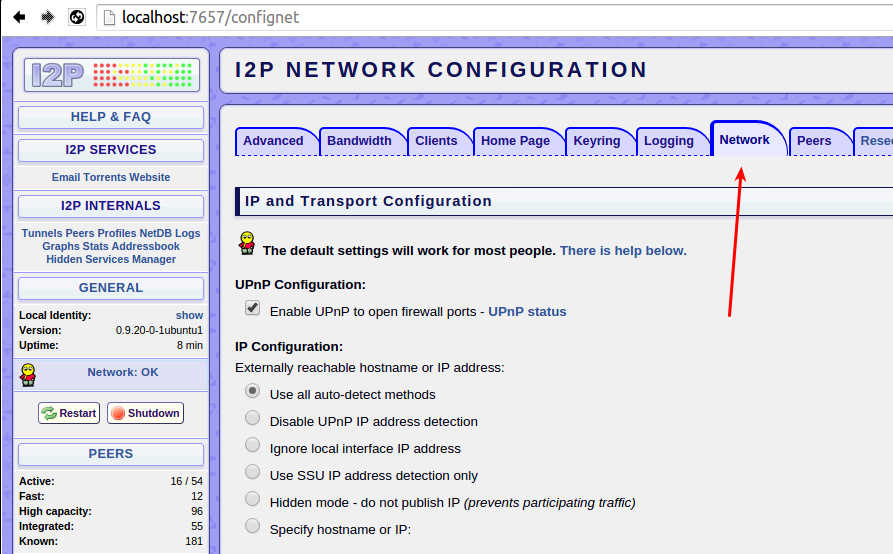
One main issue is your firewall or router is blocking connections. Click networking.
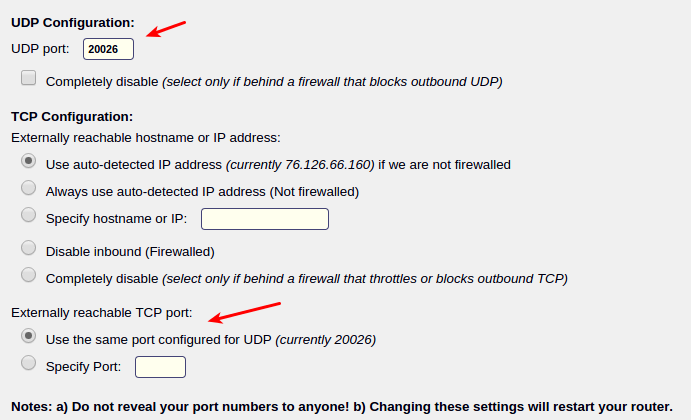
Basic port unblocking
IP Tables
- sudo iptables -A INPUT -p tcp —dport i2p port here -j ACCEPT
- sudo iptables -L
UFW
- sudo ufw allow i2p port here/tcp
- sudo ufw status
Other Anonymity Networks and Software
Here are two good resources for additional information on available Anonymity Networks and Software
gnunet.org/links/
freehaven.net/anonbib/topic.html
VPN
Community VPNs
good for activists and journalists
riseup.net
autistici.org
Paid VPNs
Recommended resource:
torrentfreak comprehensive VPN review (2014)
(remember their claims, are not a promise and even their systems could be vulnerable)
torrentfreak.com/which-vpn-services-tak.../
Free VPNs
I don’t recommend these at all but will list one that has been reliable. You’ll have to search for more.
Unfortunately you should have no expectation of privacy on a free VPN but for one time use if you have no other choice it may be helpful.
VPNBOOK.com
Of the free VPNs seems most reliable, please delicately read terms of service and
utilize Tor on-top of the VPN with any sensitive content. Free VPNs are often banned
from posting on many services due to trolling. You can search for others but so far VPNBOOK just works.
Proxy Chains
Sometimes it may be necessary to use a proxy after the Tor exit node, for instance to appear in a desired location, or if exit nodes are banned on a service.
The setup is relatively simple on Linux.
- sudo apt-get install proxychains
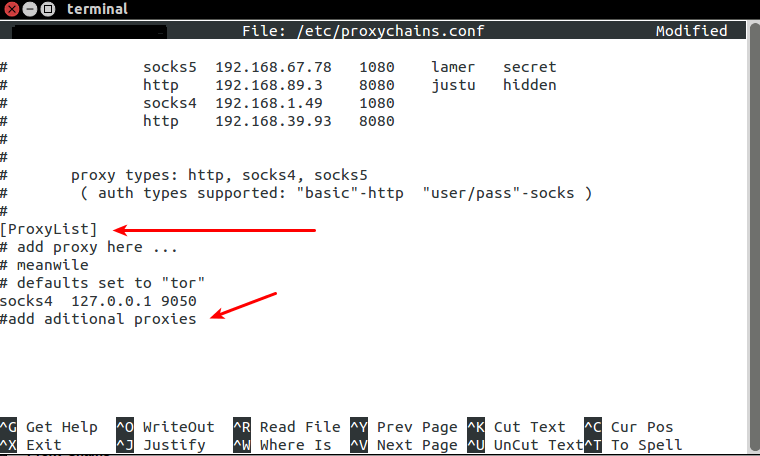
- sudo nano /etc/proxychains.conf
- following ProxyList add
socks4 127.0.0.1 9050 #Tor must go first
socks5 ipaddress port
proxies etc……
you will need to search for public socks proxy lists to populate.
start firefox in terminal: proxychains firefox
Operating Systems
The best first step is stop the use of Windows and MAC OSX, and stick with Linux.
Flash Firmware
Locate the firmware model of the motherboard on your computer and flash it with a fresh version. Some deeper level attacks embed themselves in the firmware, so it’s good practice for a clean start.
Enabling a BIOS boot password
Usually f12 to enter BIOS, find security section (UEFI may be different)
USB Bootable Operating Systems:
Recommended: TAILS, Alternatives: Whonix, Liberté Linux and QubesOS
This guide shows how to install TAILS on a USB Drive from a Virtual Machine
- Download Virtual Box: www.oracle.com/technetwork/server-stora...
- Download the latest extension package: www.oracle.com/technetwork/server-stora...
- Double click on the extension package and it should open Virtual Box, click install
- Download TAILS: tails.boum.org/download/index.en.html#f...
- Verify file identity with PGP
- Open Virtualbox and connect the USB drive
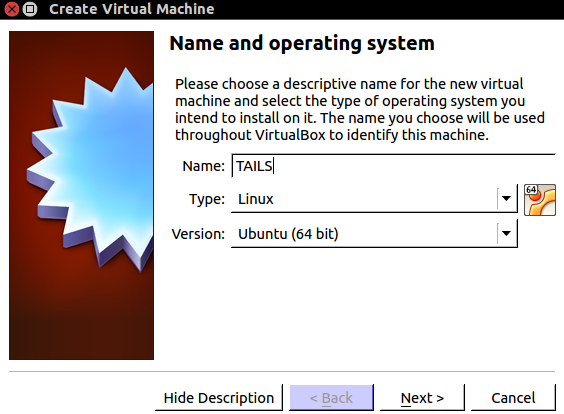
Click new in the top left

name your VM and select Linux 64bit or 32bit depending on which you downloaded
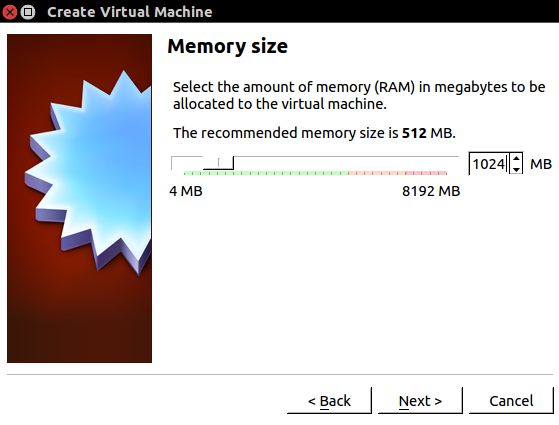
Set memory size at least 1024 for smooth performance
Create a virtual hard drive
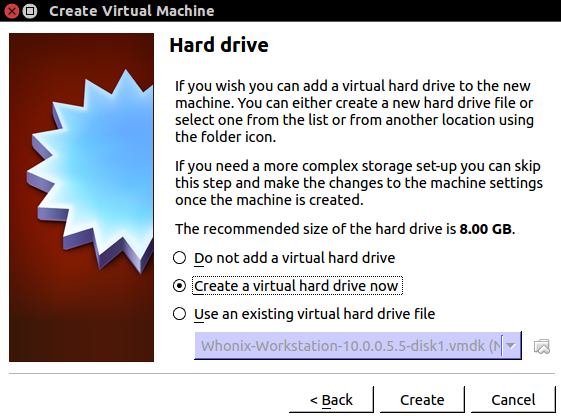
VDI Image is suitable

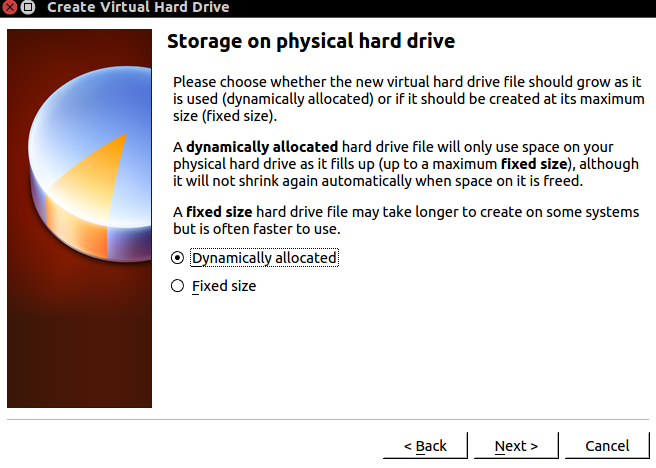
You can select dynamically allocated and set a starting amount at a couple gigabytes
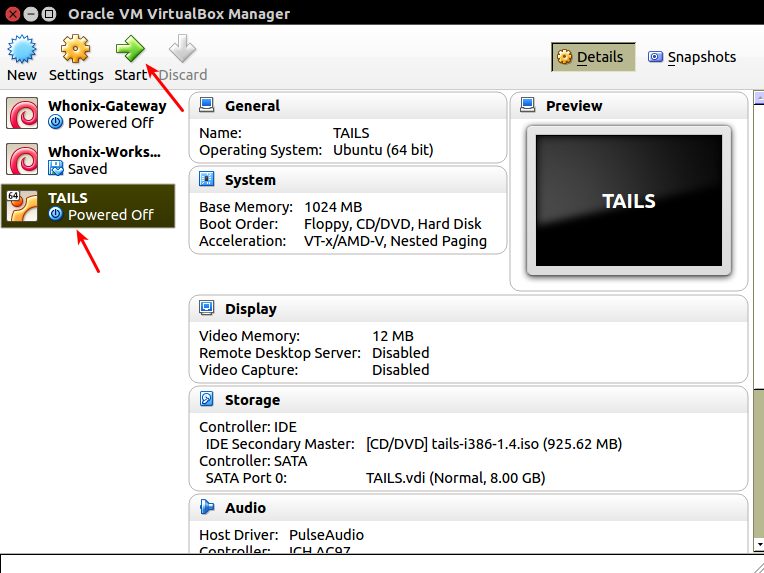
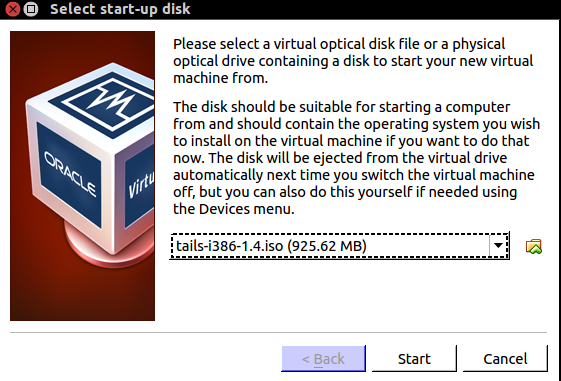
Select the image and click start
Select the location of the .iso file you downloaded.
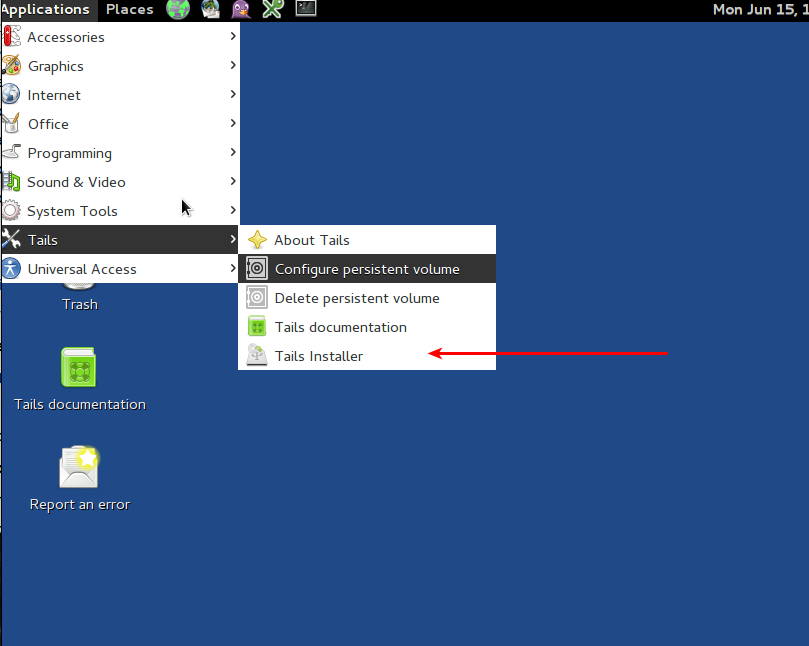
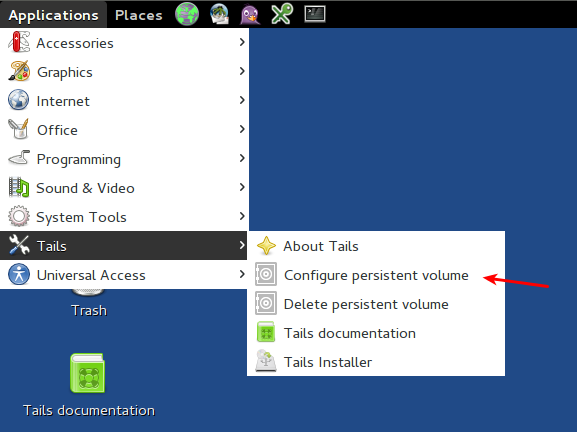
Once started go to Applications→Tails→Tails Installer
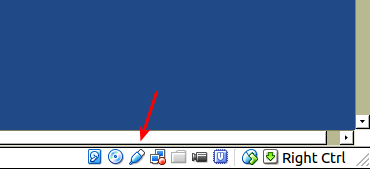
Make sure the USB Drive is present you will see a green plus, over the usb icon in this image
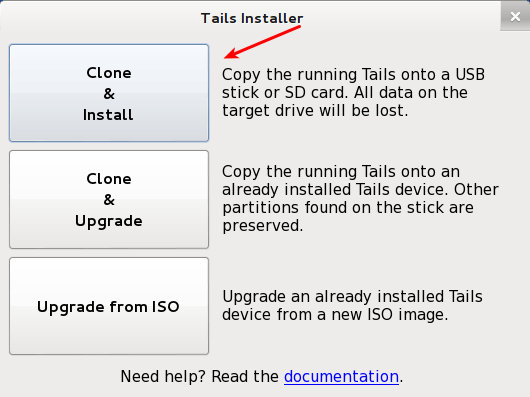
Select clone and install and follow the steps for installation
Once you’ve started tails you can create a persistent volume to store static content
- Next reboot you will be prompted if you wish to use persistent or not, only use when necessary.
Linux (image files can be found at http://distrowatch.org)
Recommended base Operating Systems: Archlinux, or Kali, alternatives: Debian Mint Ubuntu
although just using Tails as a bootable OS and having some persistent storage is probably better than most can do in terms of hardening their base system.
Secure VM with Whonix and Virtualbox
- Download both Whonix-Gateway and Workstation at www.whonix.org/wiki/Download#Download_W...
- Download Virtual Box: www.oracle.com/technetwork/server-stora...
- You may want to verify the file identities using the Signing key see other sections on this.
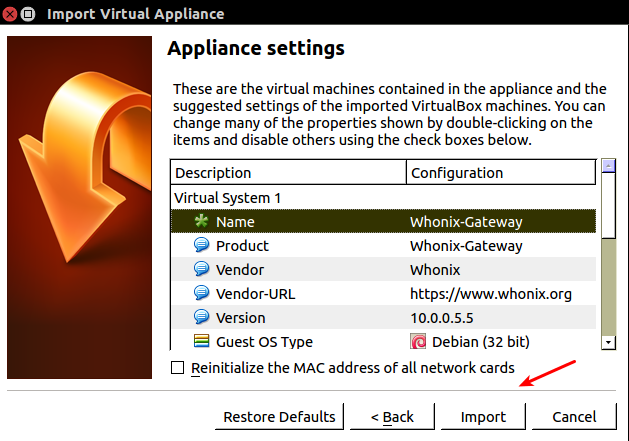
Click file import appliance and select the Whonix Gateway .ova file
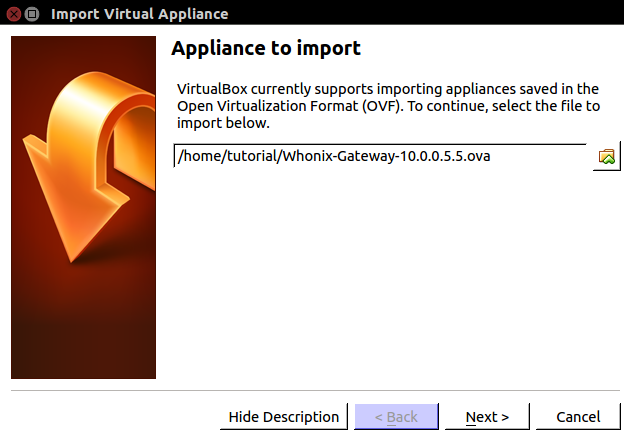
Keep the settings default and click import
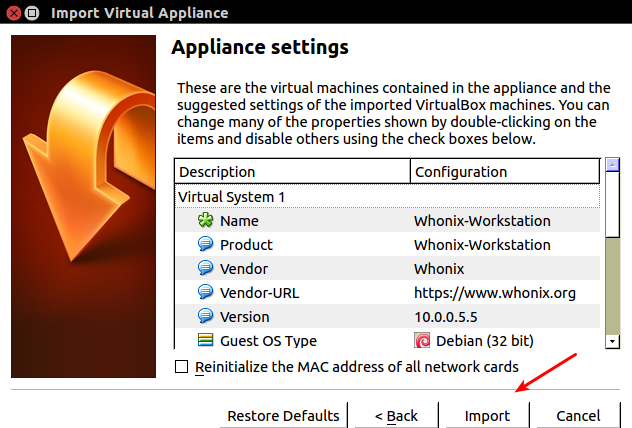
Repeat for workstation, select the .ova

Import without changing settings
Select both and start both at the same time.
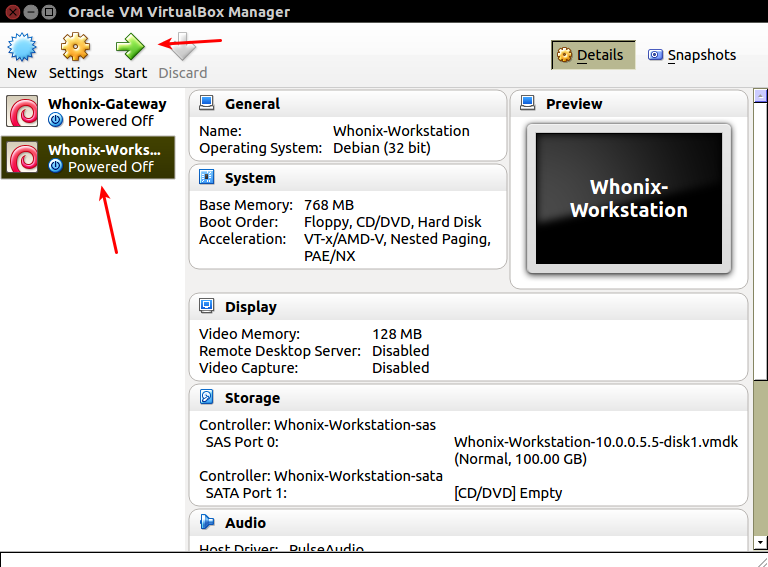
Once workstation has finished booting you will see this screen.

You will keep both VM Windows open but all activities will be within the Whonix-Workstation VM Window
Base System
Essentials:
Disk encryption – LVM Encryption during install, encrypt home directory
Bleachbit – clearing day to day files (RAM wiping is experimental but worth it on shutdown)
secure-delete package – secure wiping content
Intro guides on hardening other recommended base systems.
(may be out of date look for hardening guides)
- Kali has basic hardening
- Arch Security
- Ubuntu Security
- Debian Security
Secure Data-Wiping Linux
Consider using an OS like TAILS with minimal persistent storage and automatic memory wiping to make this easier.
Proceed with extreme caution, man pages are your friend.
BleachBit
easy, less effective
First:
sudo apt-get install bleachbit
sudo bleachbit
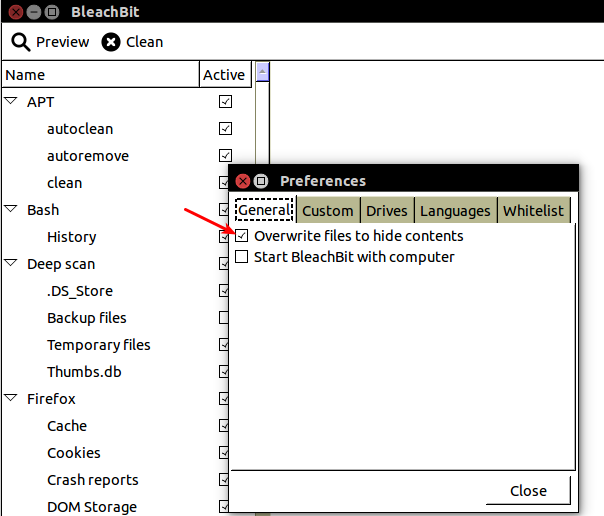
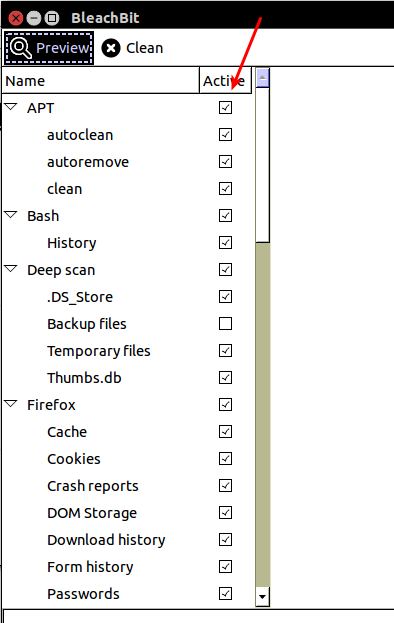
You can “Shred” files and folders from the file menu, and wipe free space, which may remove excess data that still exists, without pointers.
file→Shred files
file→Shred folder
file→wipe free space
DBAN
advanced, boot from usb/cd ideal when discarding a hard drive
go to dban.org download the dban.iso and either burn CD/DVD or write to USB and boot off the device.
Select “RCMP TSSIT OPS-II” for the deletion method
Select the drive
Prepare to wait 12+ hours
Secure-Delete
hard mode, more secure deletion that bleachbit, easier to use if you want to remove specific partitions or files, rather than complete wipe with DBAN
you will need to boot off a usb/cd if you wish to wipe your primary hard drive.
Properly deleting a drive will take time, if you’re in a hurry, you can at least use fast mode.
First:
sudo apt-get secure-delete
if you’re wiping a disk
fdisk -l
find the disk/partition name: should be /dev/sdxx
at this point if you haven’t already, consider encrypting the partition, see veracrypt.
wipe space considered free (-f is fast mode “insecure mode”)
sudo sfill /dev/sddisk#
if you need to clear swap space-
(-f is fast mode “insecure mode”)
- cat /proc/swaps
- sudo swapoff /dev/sddisk#
- sudo sswap /dev/sddisk#
- sudo swapon /dev/sdFdisk#
if you are strapped for time, use -m for 7 passes or -s for simple 1 pass “insecure mode”
sudo srm file
or
sudo srm -r /directory
or
srm /dev/sddisk#
At the end you may also be interested at the end to wipe memory on the system.
(-f is fast mode “insecure mode)
Enter:
sudo sdmem
Physical Destruction
Try to at least encrypt the disk first, if you have time to spare, follow the instructions for disk erasure with DBAN.
Open the drive. Find the platter, score it, smash it. Then you will need to locate any memory chips which may store cached files, and destroy them as well. This is an important step, and can be missed easily. Remember not to dispose in normal garbage as it’s not secure. Consider alternate means of disposable for best measure.
Fun Fact: To “officially” destroy all remnants of magnetic data you’ll need to heat it to 1500 kelvin.
Cold-Boot Attack
Older attack method recovering encryption keys stored in RAM. If possible use DDR3 or better memory. When not at the computer always shut down completely.
Consider using Bleachbit or more advanced sdmem to wipe RAM contents.
Basic Communications
Keep in mind that your use of grammar, spelling and language can be used as identifying factors. It is possible to single you out based on your specific ways of communication and link you to other public content linked to your alternate identities. When attempting to communicate anonymously remember not to mention nicknames, locations favorite music, weather or any other information that can be used to reveal your identity. Something that seems mundane and friendly can quickly be used for identification.
Images
JPG, JPEG, TIF and WAV files store EXIF data, or Exchangeable image file format, that can store sensitive information, including GPS-location, and the unique ID of the device used. It is recommended to always use the PNG format, and scrub any metadata, if you need to exchange an image. One option is the Metadata Anonymisation Toolkit that comes with TAILS, and also available at https://mat.boum.org/
Email Providers
No mail provider can be trusted completely no matter what their security claims are. Utilize PGP as often as possible and utilize an anonymous connection when connecting.
protonmail.ch
Protonmail is currently invite only and requires a wait time of anywhere from a month or more to get in. However, it’s a highly respected secure email solution. You can employ PGP and encrypted storage. They have a favorable location
Tutanota.com
Tutanota offers encrypted mail-storage and the use of a one time password, however PGP has to be done manually as there is no smtp or imap mail servers. They have a favorable location that is difficult to retrieve data from with legal orders.
mail2tor.com
While tor based mail providers have had a storied history. If PGP is utilized for all communications, the threat is eliminated. If you receive something compromising in plain text, don’t consider this information secure, and inform any correspondents to employ PGP.
riseup.net
United States based privacy centric collective that offers mail and other privacy capabilities.
openmailbox.org
free, secure email provider
startmail.com
paid email
pgp webmail client
offshore hosting more protected from spying
vmail.me
free, no personal information
account deletion
encrypted data storage
user details like ip address and user agent stripped from headers
autistici
privacy centric collective offering email, hosting, vpn and other anonymity service
Jabber_XMPP/OTR
- sudo apt-get install pidgin
- go to tools→preferences
- Logging: disable log all instant messages/log all chats
- Go to proxy
- Select Socks 4
- enter: 127.0.0.1 9050
- Go to developer.pidgin.im/wiki/ThirdPartyPlugins
- Under Security
- Download/Install: Off-The-Record, Pidgin-GPG
- Install any dependencies Activate Plugins in: Tools→Plugins
- Once activated, select configure plugin for both
For OTR
- you will need to generate a unique key
- Enable Private messaging
- Disable logging
- Automatically initiate private messaging (optional)
- Select show OTR in tool-bar
- If a conversation is not private you will see a box saying Not Private
- Click Start Private Conversation
- If your partner has OTR properly configured it will display private.
For Pidgin-GPG
- select main key in options
- toggle encryption mode in conversations:
- options→toggle openpgp encryption
Alternative Messaging Options
pond (pond.imperialviolet.org/)
forward secure, asynchronous messaging for the discerning. Pond messages are asynchronous, but are not a record; they expire automatically a week after they are received. Pond seeks to prevent leaking traffic information against everyone except a global passive attacker.
scramble.io
secure messaging between scramble users
bitmessage.org
p2p encrypted messaging, like sending messages as Bitcoins
bitmessage.ch (tor and i2p urls available)
webmail gateway for bitmessage with instant send to other users with @bitmessage.ch address
GNUPG/PGP Basics
A PGP Key is a unique identifier, do not re-use across accounts and especially not with any public address.
Simple PGP On Linux
terminal
Ubuntu- sudo apt-get install gpa gnupg2
Arch- sudo pacman -s gpa gnupg2
Generating Keys-
- in terminal enter: gpg –gen-key or open gpa in terminal and it will prompt you to create one.
- follow the prompts
in most cases select option 1 – RSA and RSA (default)
select at least 2048 key size
key expiration, hit enter if not needed.
do not enter real information for contact (unless intended)
use a secure passphrase for the key
it will then ask you to move the mouse, type etc to create entropy
Simple PGP with GNU Privacy Assistant
If you open gpa it will guide you through creating your first key
don’t put real information unless intended, obviously

You may also want to create it via terminal, this is how it looks

The end result will look like this

Either click refresh or restart gpa and the keys will appear
Click the clipboard
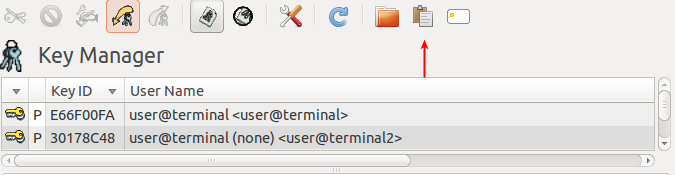
Enter your message
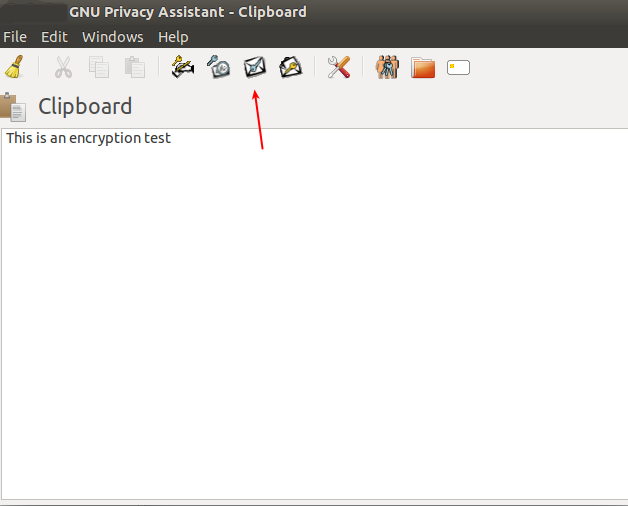
Select the key you wish to sign it with
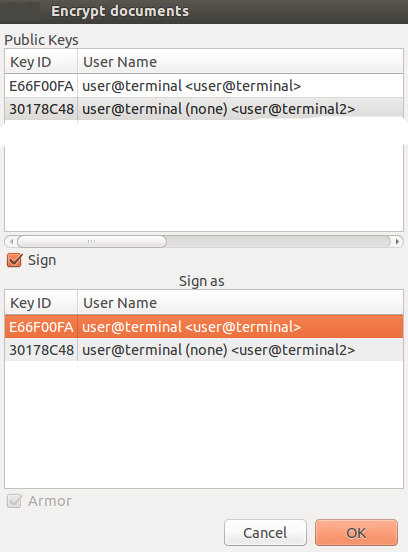
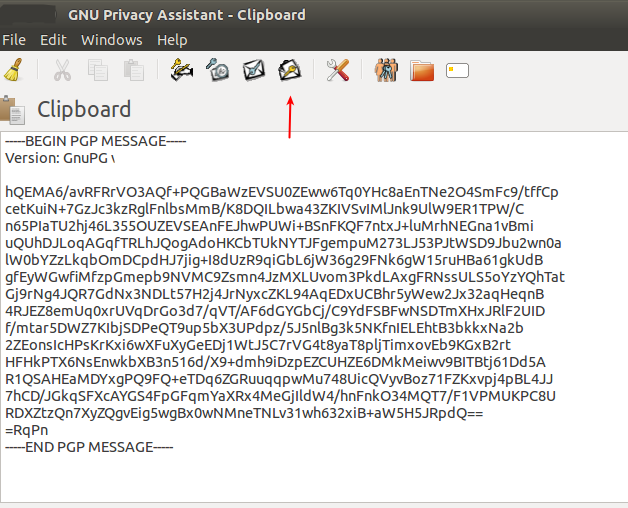
You will now see an encrypted message.
To decrypt a message click the mail icon with the key, and it will allow you to choose the appropriate key.
More details on GPA
Exporting/Importing Public Key
gpa
- select your key-pair, and then select keys→export or import keys and proceed
Exporting/Importing Private Key
gpa
- select your key-pair, and then select→keys→export or import keys and proceed
- either choose where to save or paste the desired key
Verifying a message
gpa
- select→keys→imports
- paste the public key
- Select window→clipboard
- Paste the entire text
- Click icon with the green key (hover over for title if hard to see)
- If the information is genuine it will display the name of the previously imported public key.
Verify a file
- gpa
- select→keys→import
- paste the public key
- back to terminal
- gpg —verify file
PGP with Email
Thunderbird is probably the most widely known, if you prefer reference the Ubuntu guide below which explains alternates.
- sudo apt-get install thunderbird enigmail
- Open Thunderbird
- Open Preferences→enigmail→Preferences
- Set the GPG path, in Ubuntu default is /usr/bin/gpg
You can also cut and paste your messages from GPA into the message window.
TAILS PGP
TAILS has an OpenPGP Applet
Visual Guide: tails.boum.org/doc/encryption_and_priva...
Additional reading on PGP
Recommended Best Practices for PGP from Riseup.net
https://help.riseup.net/en/security/message-security/openpgp/best-practices
http://nzh3fv6jc6jskki3.onion/en/security/message-security/openpgp/best-practices
Additional Reading:
help.ubuntu.com/community/GnuPrivacyGua...
www.math.utah.edu/~beebe/PGP-notes.html
PGP Versions
PGP Versions can reveal the users operating system, and you should research strange versions as some PGP Libraries are known to have weak encryption.
Validating Files with MD5 or SHA1:
SHA1 Sum
When the file is provided ideally a SHA1/MD5/PGP Sum will be provided. It will look like a long string of characters.
In Linux terminal type: sha1sum filename
The output should be the same as the supplied string.
MD5 Sum
When a file is provided ideally an SHA1/MD5/PGP Sum will be provided. It will look like a long string of characters.
In Linux terminal type: md5sum filename
The output should be the same as the supplied string.

