TK-TODO: Write an introduction?
- 1 Background
- 2 Instructions
- 2.1 Client setup
- 2.2 Server setup
- 3 See also
Background
All corporate services (Google Contacts, Apple iCloud Contacts, etc.) use a publicly available, standard protocol for communicating about actors such as people or organizations called CardDAV, the Calendaring extensions to the Web-based Distributed Authoring and Versioning protocol. When you’re using Google Contacts, you’re using CardDAV. But you can use CardDAV without using Google (or Apple, Microsoft, etc.) by replacing your Google-provided applications with one or more of the many alternative free software programs capable of providing the same CardDAV features. This guide shows you how.
Instructions
This section describes the general process of setting up software that understands CardDAV. We call these various software tools “CardDAV clients” or “CardDAV servers.” In most cases, you will only have to concern yourself with learning to use one CardDAV client. People who wish to administer a shared calendar service for their comrades will also need to familiarize themselves with at least one CardDAV server.
Client setup
This section describes setting up a client for a CardDAV account. Please note the following before you begin:
- You almost certainly already have a CardDAV client available to you on your existing smartphone or laptop computer; most people will likely have no need to download and install an additional app. That said, you are welcome to choose the software you prefer, and can generally mix-and-match such softwares as you wish.
- You will need access to a CardDAV server. If you were pointed at this page by a comrade, that comrade may already have set up a CardDAV server for you to use. If not, see the Server setup section for some guidance regarding how to set up your own CardDAV server.
- The guidance in this section assumes you (i.e., the client) are not using the privacy-enhancing overlay network known as Tor. Please see the CardDAV over Tor subsection(s) for additional guidance regarding how to make your client application(s) work while connecting through the Tor network.
Apple Contacts
macOS computers supply an application called Contacts as part of their base system. If you have a Mac, you already have the “Contacts” app, which is a CardDAV client. This means you already have everything you need to use a CardDAV shared address book (including Google Contacts, but also any other CardDAV service).
Do this to add a CardDAV address book to your macOS computer:
- Open the “Contacts” application (
Contacts.app) on your computer. You can do this by searching for “Contacts” from a Spotlight search, or navigate to the/Applicationsfolder in a Finder window. - Go to the application menu (the one that reads
Contacts), and select Add Account…. The “Choose a Contacts account provider…” sheet will appear. - Select the option that reads Other Contacts Account… and then click Continue. The “Add a Contacts account” sheet will appear.
- From the Account Type drop-down menu, choose Manual. You will be presented with three text fields asking for your CardDAV account details, labelled:
- User Name – This is your account’s username. This is usually your email address or a name you chose. (For a Sandstorm-provided account, it will probably be
sandstorm). - Password – This is your account’s password. This is almost always something you chose. (For a Sandstorm-provided account, it will be a randomly generated string available from the Web Browser interface of the Radicale grain.)
- Server Address – This is the address of the CardDAV server itself; this will be provided to you by your system administrator or the service you use. (For a Sandstorm-provided account, it will be a regular Web address—i.e., a URL—findable by clicking the small cloud icon to the left of the Web Browser interface of the Radicale grain.)
- User Name – This is your account’s username. This is usually your email address or a name you chose. (For a Sandstorm-provided account, it will probably be
- Press the Sign In button on the “Add a Contacts account” sheet. Your new address book will appear in the Apple Contacts application’s sidebar.
Mozilla Thunderbird
Mozilla Thunderbird is a free, cross-platform personal information manager, which is also a CardDAV client. You can use it as an alternative to Apple Contacts on macOS, or to Microsoft Outlook on Windows, as well as on GNU/Linux.
Do this to add a CardDAV address book to your computer with Mozilla Thunderbird:
- Open Mozilla Thunderbird on your computer.
- If this is your first time running Thunderbird, it will prompt you to make a new email address or use your existing address. You can do this if you want, but for the purposes of CardDAV it is unnecessary, so you can just click “I think I’ll configure my account later.”
- Install the CardBook add-on to Thunderbird:
- From the Tools menu, choose Add-ons.
- Click on Extensions in the left-hand sidebar.
- In the search field, enter
CardBook. - Click the Install button next to the CardBook add-on.
- Click on Restart now to restart Thunderbird and load the CardBook add-on.
- Click on the “Contacts” icon near the upper-right corner of the Thunderbird window to view Thunderbird’s CardBook address book interface.
- Right click below the Address Books menu and click New Address Book. The “Add a new address book” dialogue will appear.
- Under the Address book location: field set, choose Remote, and then press the Continue button.
- In the Type field set, choose CardDAV.
- In the Location text field, put the address of the CardDAV server itself; this will be provided to you by your system administrator or the service you use. (For a Sandstorm-provided account, it will be a regular Web address—i.e., a URL—findable by clicking the small cloud icon to the left of the Web Browser interface of the Radicale grain.)
- In the Username field, enter your account’s username. This is usually your email address or a name you chose. (For a Sandstorm-provided account, it will probably be
sandstorm). - In the Password field, enter your account’s password. This is almost always something you chose. (For a Sandstorm-provided account, it will be a randomly generated string available from the Web Browser interface of the Radicale grain.)
- Click the Validate button. This will test your connection settings and, when successful, will enable the Continue button, which you should click.
- In the next screen, choose a meaningful Name and your preferred Color for the address book. (Leave the other settings at their default values.)
- After clicking Continue, then clicking Done, your new address book should appear!
Mozilla Thunderbird with Tor
Additional configuration steps are required for Mozilla Thunderbird to successfully route its requests through the Tor privacy-enhancing overlay network. Note that if you will be accessing an authenticated Tor Onion service ("hidden service"), you will also need to configure your Tor client itself.
Do this to have Mozilla Thunderbird connect to servers over Tor:
- Download and install the Tor Browser. The Tor Browser installer contains a Web browser and bundles the complete Tor software along with it.
- Open (launch) the Tor Browser. To use your CardDAV client through Tor, the Tor Browser must be open and running at all times.
- Open (launch) Mozilla Thunderbird, if it is not already open.
- Configure Thunderbird to use a SOCKS proxy from its Preferences window, which is accessible under the Thunderbird (macOS) or Tools (Windows and GNU/Linux) menu, depending on your Operating System:
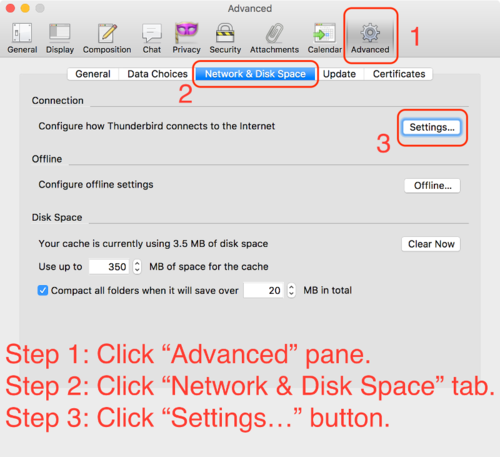
- Click on the Advanced pane.
- Click on the Network & Disk Space tab.
- Under the Connection heading, click the Settings… button. The “Configure Proxies to Access the Internet” sheet will appear:
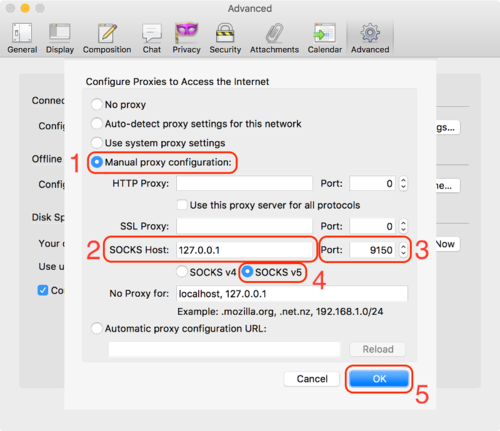
- Choose the Manual proxy configuration radio button.
- For SOCKS Host, enter
127.0.0.1. - For Port, enter
9150; this is the default port number used by Tor Browser. If your Tor uses a different SocksPort, you should enter it here. - Choose the SOCKS v5 radio button.
- Press the OK button to save your new settings.
- Configure Thunderbird to use the same SOCKS proxy for its DNS resolution queries; this is required to access CardDAV servers running as Tor Onion services (i.e., servers available at domain names that end in
.onionaddresses).- From Thunderbird’s Preferences window:
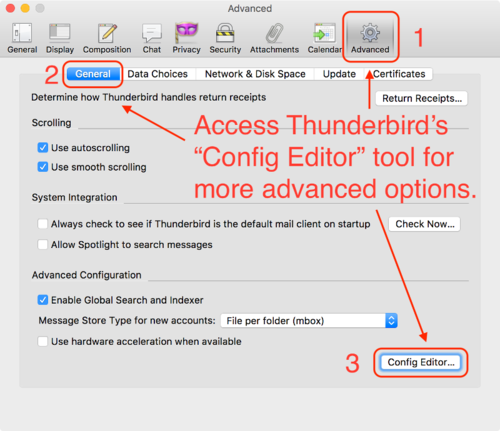
- Click on the Advanced pane.
- Click on the General tab. (Do not confuse this with the “General” pane.)
- Click on the Config Editor… button. Thunderbird’s
about:configinterface will appear.- If this is the first time you have opened the Config Editor, you may be presented with a warning telling you that you will “void your warranty” if you continue. This is a joke in arguably poor taste; Mozilla Thunderbird provides users with no warranties of any kind, and never has. Proceed through the warning to access the Config Editor.
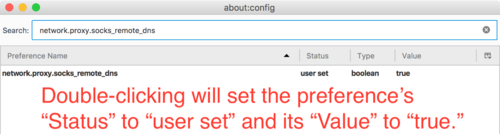
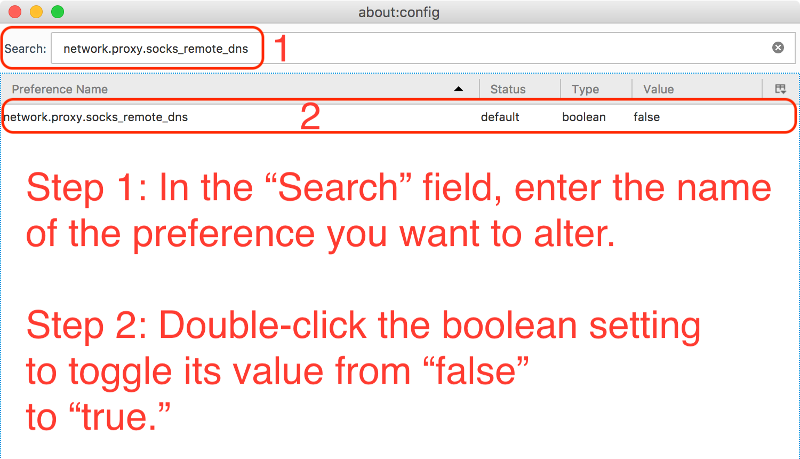
- In the Search field, enter
network.proxy.socks_remote_dnsto filter the advanced configuration options down to this specific option:

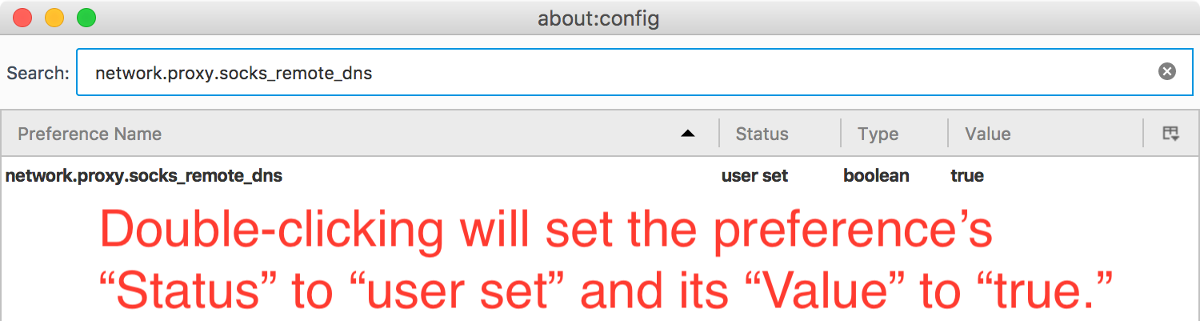
- Double-click on the
network.proxy.socks_remote_dnsline item to toggle its value fromfalsetotrue:
- From Thunderbird’s Preferences window:
- Close (quit) and re-open (launch) Mozilla Thunderbird again.


iOS
TK-TODO
Android-based phone
Most Android smartphones come with an address book application, typically called “Contacts,” but out-of-the-box support for CardDAV sync features is arbitrarily limited to technocapitalist products such as Google Calendar that demand possession of all your data (which is why we call them “possessors”). Thankfully, several free software alternatives exist for Android, but you will need to install them yourself. This section shows you how.
Overview for Android:
Install F-Droid
F-Droid is an app store for Android phones, much like the Google Play Store, but enhanced with a number of important features. It gives you access to numerous apps that you would otherwise have to pay for if you bought them on the Google Play Store, as well as additional apps not available on the Play Store because their developer cannot afford the listing fee Google requires to list apps in the Play Store in the first place. Moreover, F-Droid also allows you to share an app without the Internet; if you and a friend both have F-Droid installed, but you have an app your friend doesn’t, your friend can get the app onto their phone from your phone instead of from a far away device across the Internet.
Installing F-Droid from the Internet
If you don’t have a friend with F-Droid installed on their phone physically near you already, you need to get F-Droid from the Internet.
Do this to download and install F-Droid from the Internet:
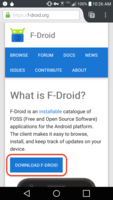
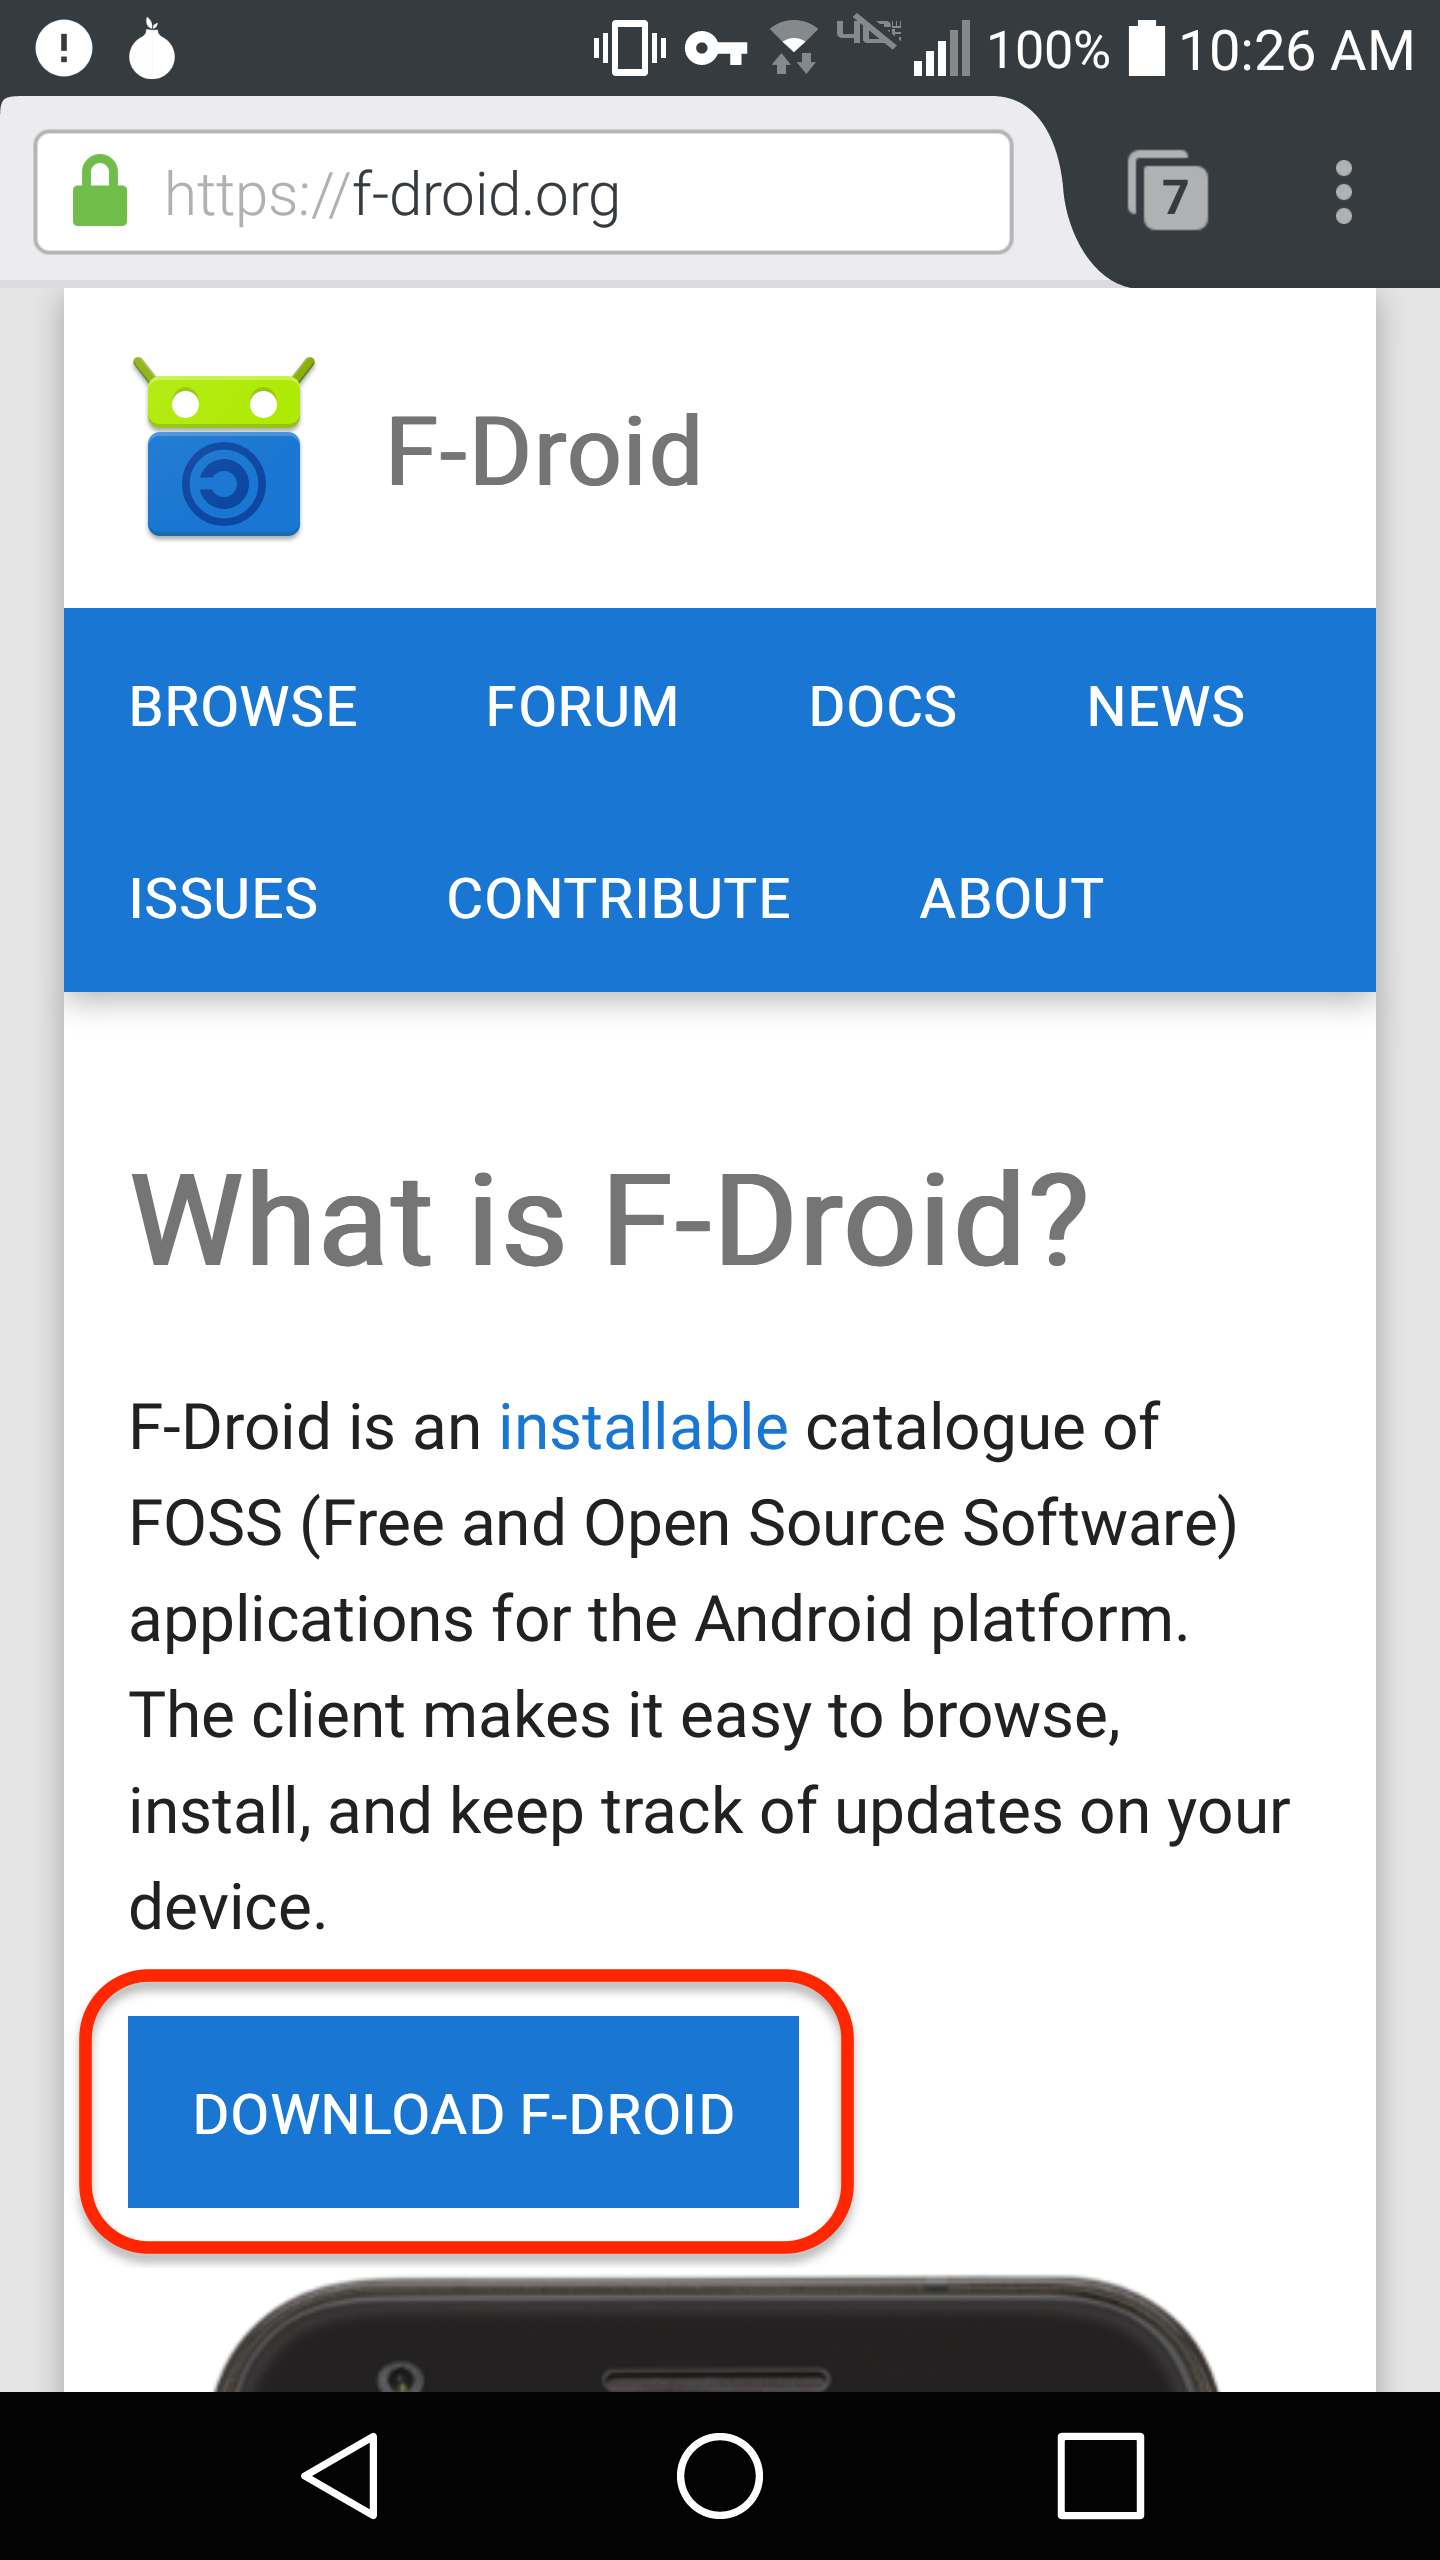
- In your phone’s Web browser, visit F-Droid.org. The F-Droid homepage will load.
- Click the Download F-Droid button on the F-Droid homepage. The F-Droid installation package for Android (.
apkfile) will be downloaded to your phone.
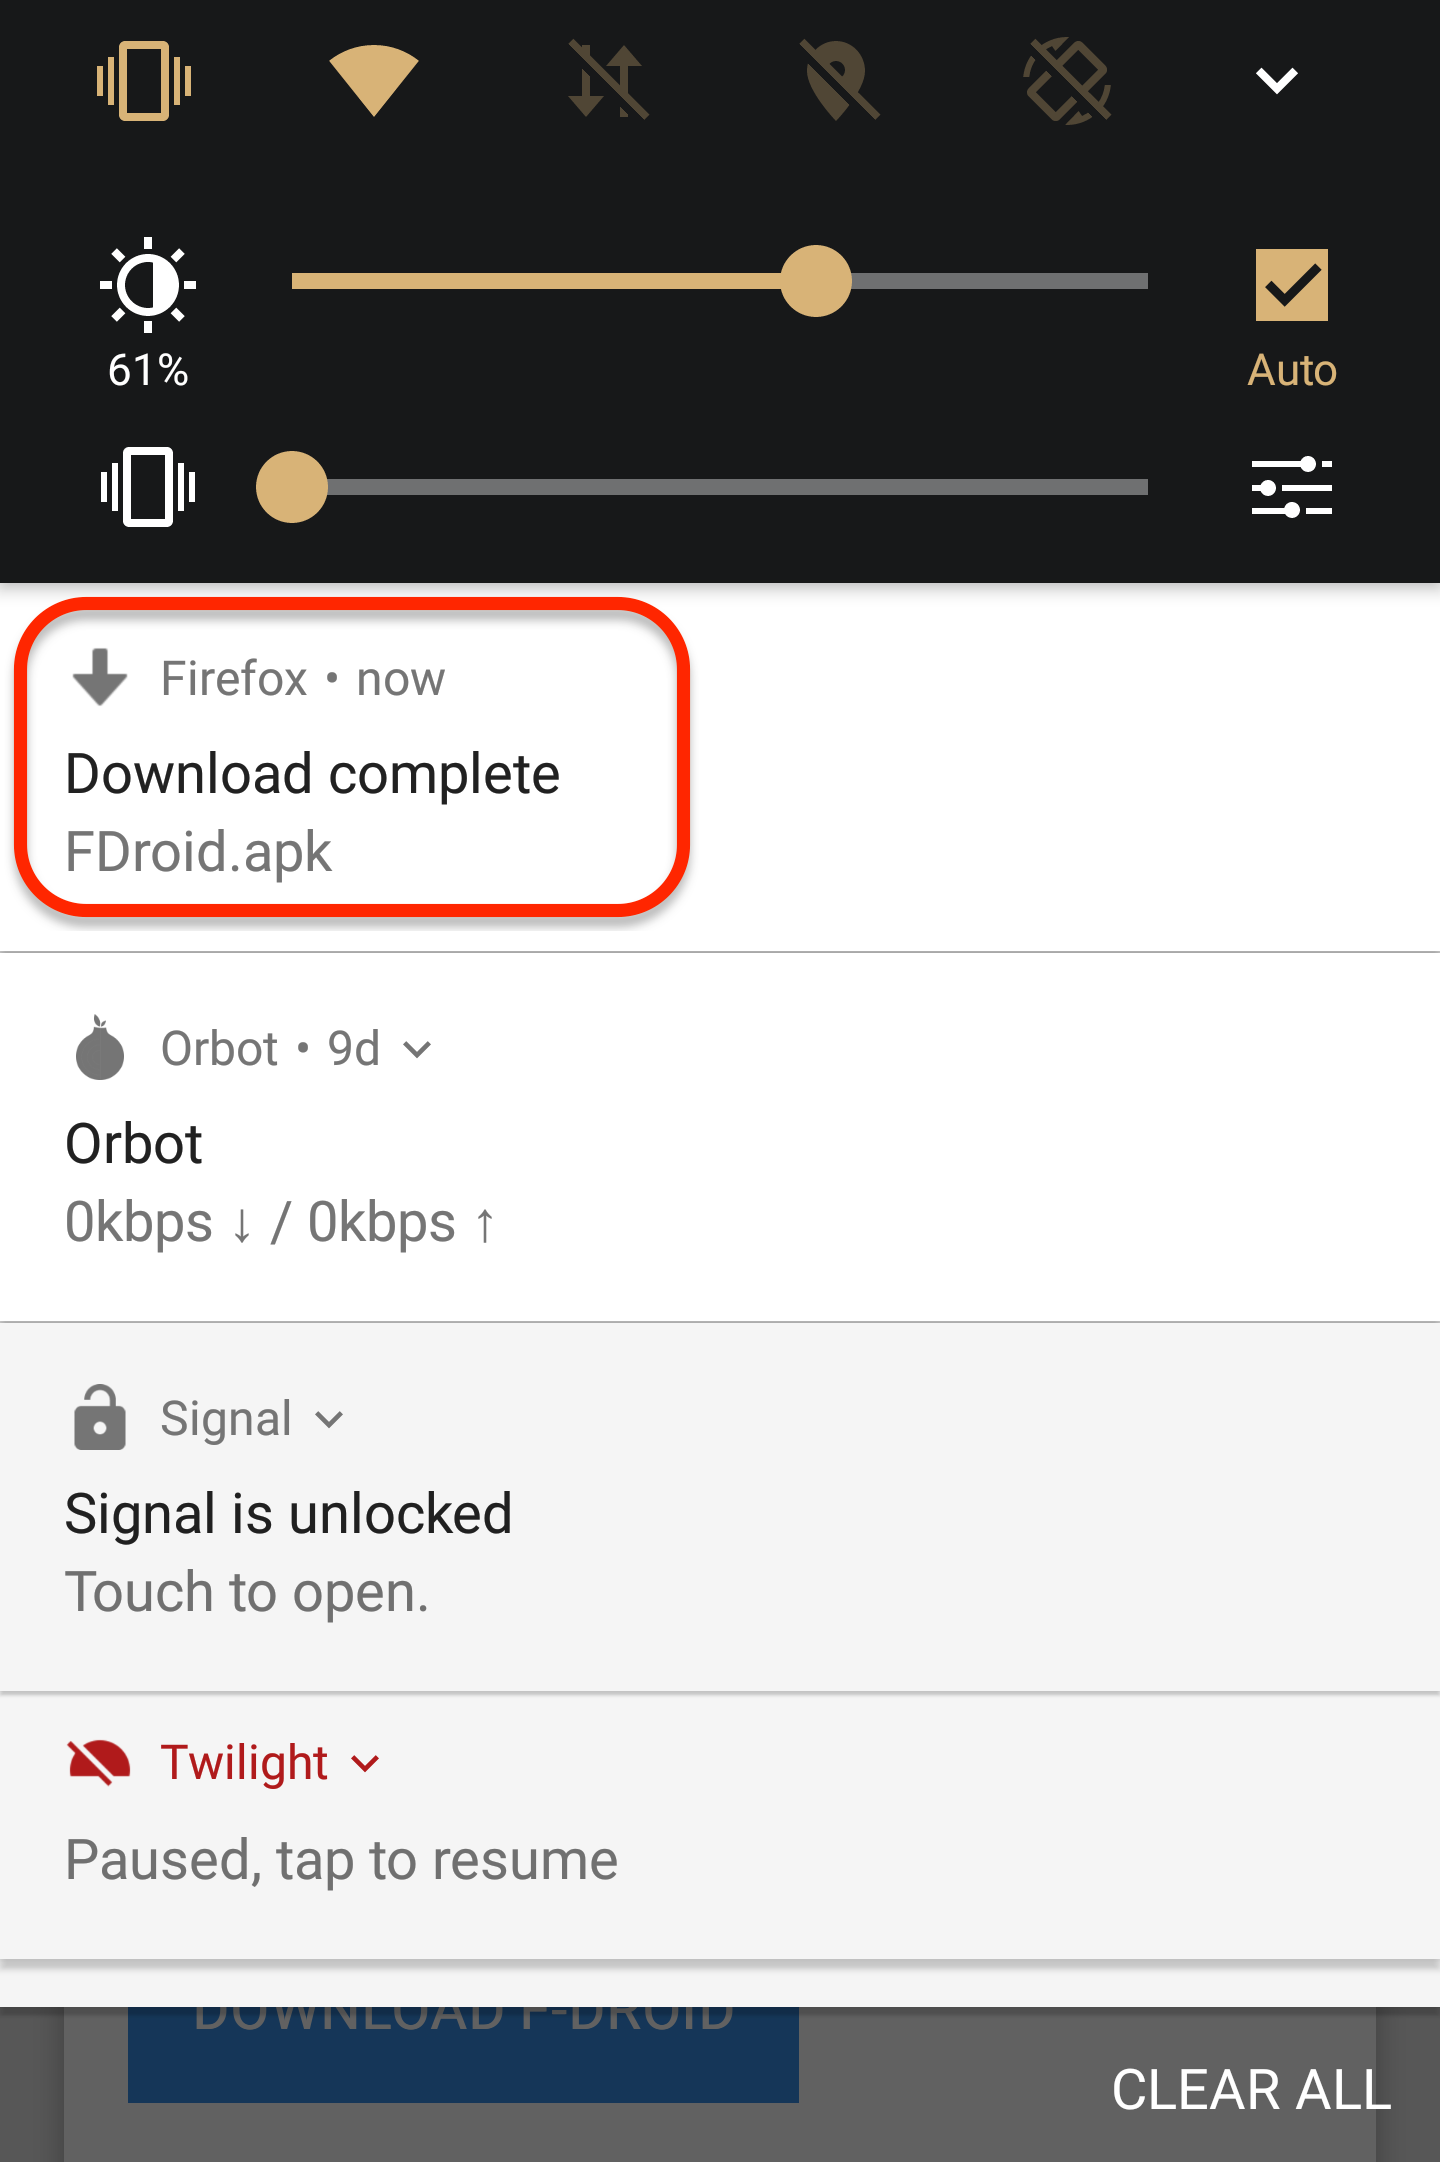
- Open the downloaded installer package using the notification shade or any file manager. Your phone’s package installer will open.

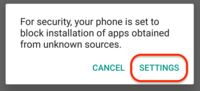
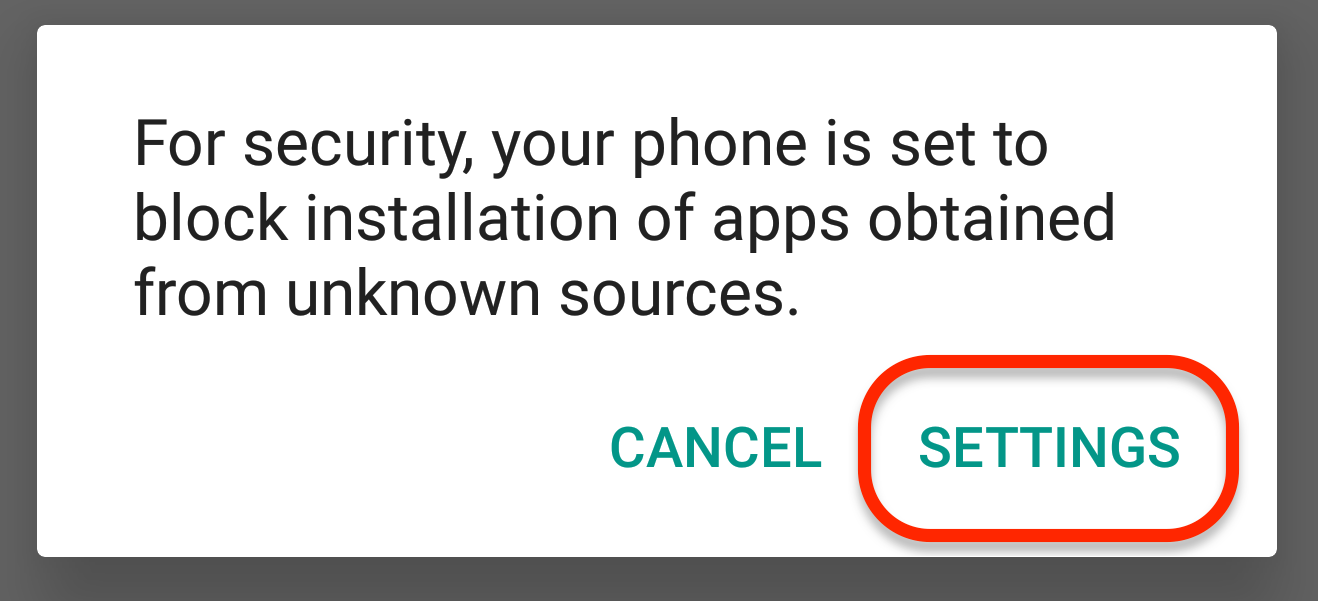
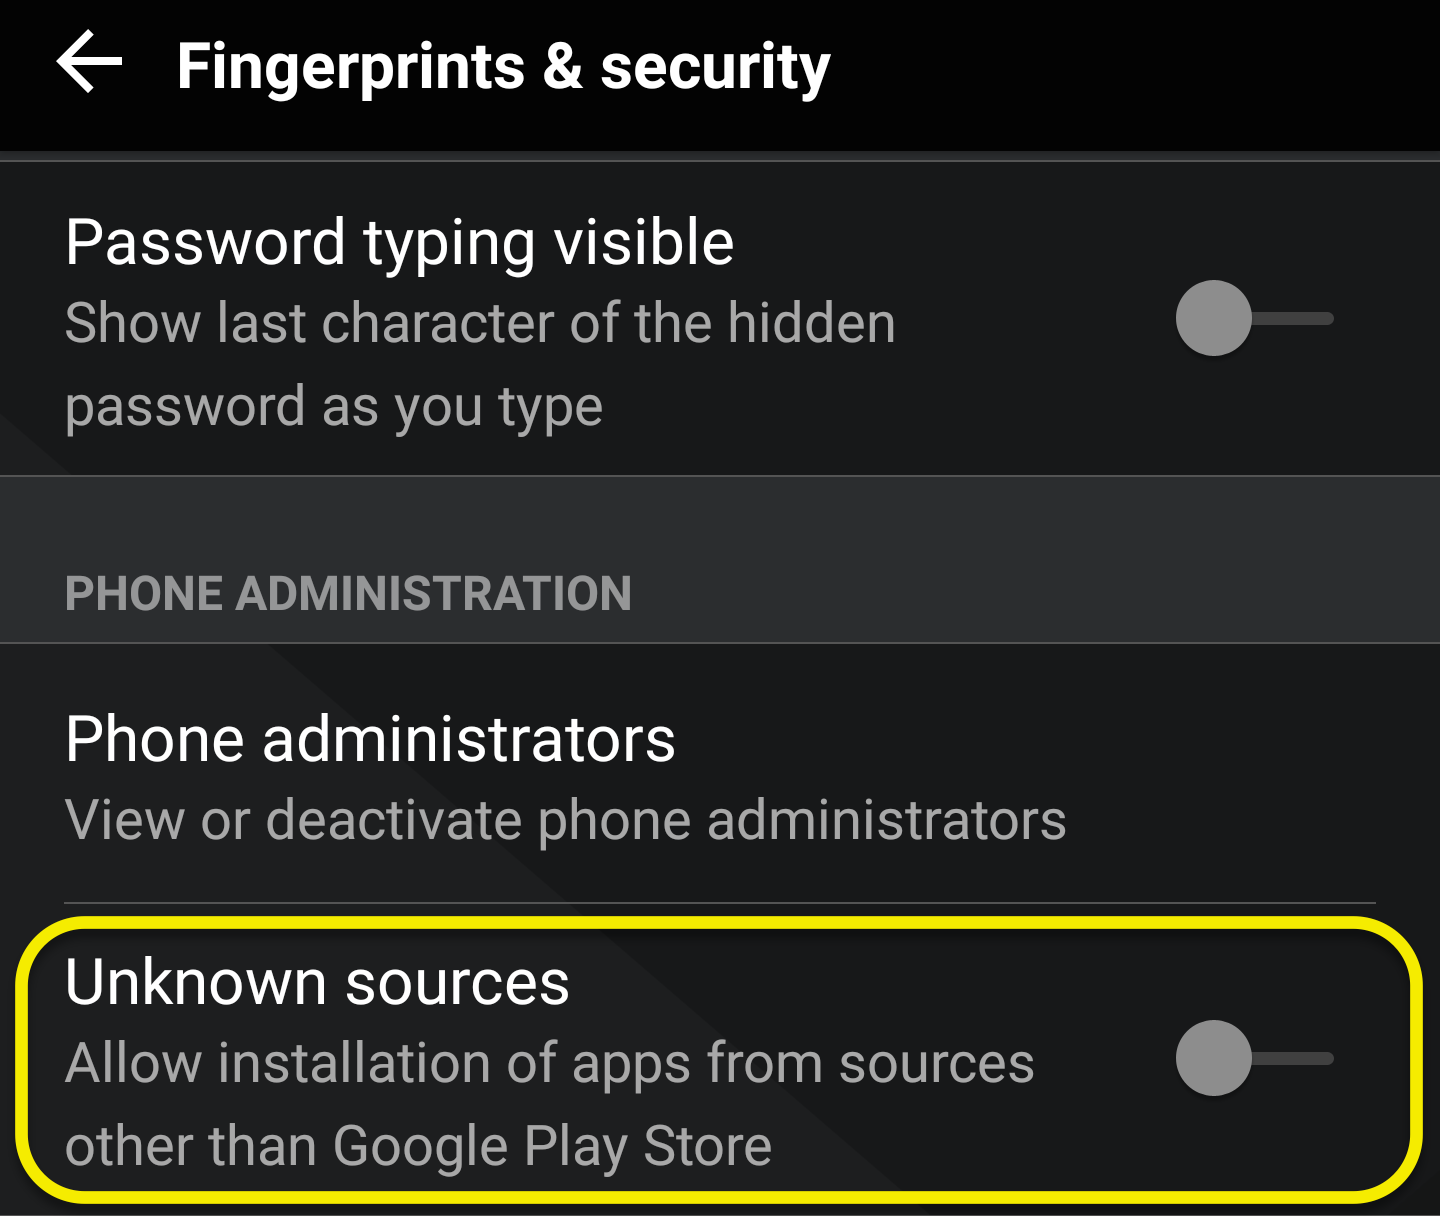
- If this is the first time you’ve tried to install an app from somewhere other than the Google Play Store, you will see a dialogue box that reads something like “For security, your phone is set to block installation of apps obtained from unknown sources.” If you see this, Tap the Settings button to go to the Security section of your phone’s system settings.
- Toggle the Unknown sources option on (enable it). This allows you to install software from downloaded files. After you finish this procedure, we recommend that you return here and toggle the option back off.
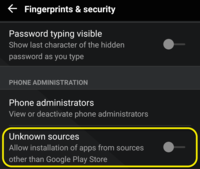
- Return to your file manager and re-open the F-Droid installer package.
- Toggle the Unknown sources option on (enable it). This allows you to install software from downloaded files. After you finish this procedure, we recommend that you return here and toggle the option back off.
- Tap Install to install F-Droid.
Installing F-Droid from a friend’s phone
TK-TODO
Install DAVdroid
DAVdroid is a CardDAV client that integrates well with the built-in address book applications on Android phones. It is available for purchase from the Google Play Store and is available for free from the free software F-Droid catalog. We recommend you install DAVdroid from the free software F-Droid catalog. If you don’t have F-Droid yet, install F-Droid first, then return here.
Do this to install DAVdroid:
- Open the F-Droid app on your phone.
- Tap the magnifying glass icon and search for
DAVdroid, then tap on the DAVdroid search result to view the DAVdroid package detail screen. - Tap the Install button to download DAVdroid from the Internet and attempt to install it. The package installer will open.
- If this is the first time you’ve tried to install an app from somewhere other than the Google Play Store, you will see a dialogue box that reads something like “For security, your phone is set to block installation of apps obtained from unknown sources.” If you see this, Tap the Settings button to go to the Security section of your phone’s system settings.
- Toggle the Unknown sources option on (enable it). This allows you to install software from downloaded files. After you finish this procedure, we recommend that you return here and toggle the option back off.
- Return to F-Droid’s package detail page and tap the Install button again.
Configure DAVdroid
Do this to configure DAVdroid to sync with a CardDAV server:
- Open the DAVdroid app on your phone.
- Tap the + (add new account) button. The “Add Account” activity screen will open.
- Tap Login with URL and user name. Three text fields will appear:
- Base URL is the server address of the CardDAV server; this will be provided to you by your system administrator or the service you use. (For a Sandstorm-provided account, it will be a regular Web address—i.e., a URL—findable by clicking the small cloud icon to the left of the Web Browser interface of the Radicale grain.)
- User name is your CardDAV account’s username; this is usually your email address or a name you chose. (For a Sandstorm-provided account, it will probably be
sandstorm). - Password is your CardDAV account’s password; this is almost always something you chose. (For a Sandstorm-provided account, it will be a randomly generated string available from the Web Browser interface of the Radicale grain.)
- Tap the Login button. The “Create Account” screen will appear.
- Give the account a meaningful name.
- Tap the Create Account button. The DAVdroid main activity screen will appear.
- Tap the account you created. The account detail screen will appear, showing a list of the address books available to your account.
- Tap the checkbox next to the address books you want to synchronize to your phone from the CardDAV server.
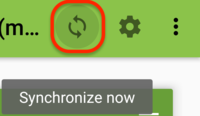
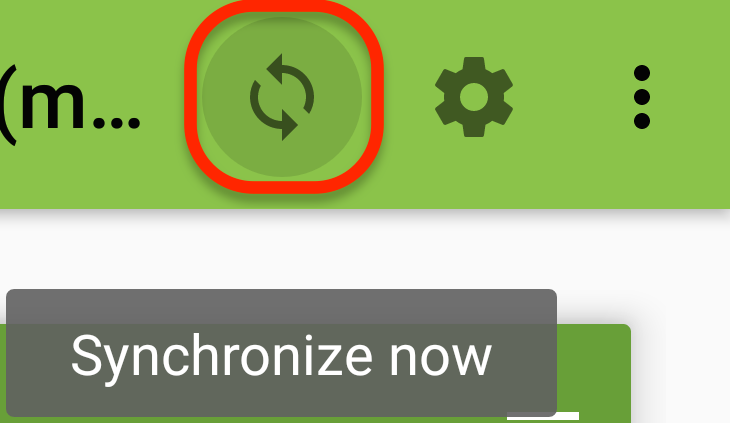
- Tap the “Synchronize now” button to begin syncing. DAVdroid will now periodically check for updates to the selected calendar(s).
Your smartphone’s built-in address book application should now be able to display contacts from the synchronized address book. If you have permission to make changes to the contacts in the address book, you can use your smartphone’s built-in address book application to update the synchronized address book, as well.
Server setup
TK-TODO
Self-hosted Radicale instance as a Tor Onion service
See Radicale.
Radicale+InfCloud on Sandstorm
TK-TODO
See also
- Calendar
- Digital calendars, journals, and task lists (using CalDAV).

