- 1 Brief Summary
- 2 Adding a New IMAP Account
- 2.1 Start the Account Wizard
- 2.2 Step One: Mail Account
- 2.3 Step Two: Identity
- 2.4 Step Three: Server Information
- 2.5 Step Four: User Names
- 2.6 Step Five: Account Name
- 2.7 Step Six: Finish
- 3 Configuring your IMAP Account
Brief Summary
You will find a detailed tutorial below.
NOTE you need to enable secure connections before you can use Riseup! The first time you run Thunderbird, it will run through a wizard and ask you some settings questions, it will by default set you up with an unencrypted connection and then immediately try to check your email in an insecure way!. After you finish the wizard, do not type in your password when the server asks you for it, instead click cancel Before you can continue, you will need to setup the encrypted connection settings, to do that make sure you follow through and configure your imap account
Adding a New IMAP Account
Start the Account Wizard
The first time you run Thunderbird, the account wizard will walk you through setting up an account. When the wizard runs, it will set you up with an unencrypted configuration to Riseup! This is bad, and you absolutely need to change this configuration before you continue. Riseup will not work with unencrypted connections! Once you have followed the instructions below, be sure to setup the encrypted connection by configuring your imap account settings
If the wizard does not open, you can do this:

- Choose the menu item Edit > Account Settings… (if you have an older version of thunderbird, account settings might be under the Tools menu).
- Click the Add Account… button.
Step One: Mail Account
Once the new account wizard is open, you will see this:
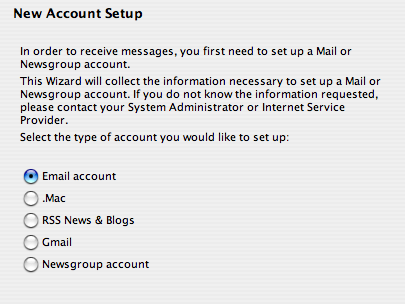
- Select Email account
- Click the Next button.
Step Two: Identity
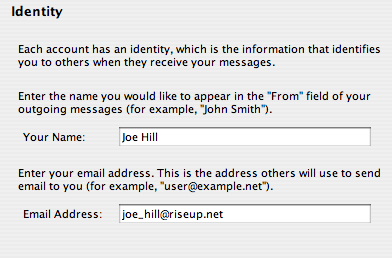
- For Your Name, put whatever you want.
- For Email Address, put your full email address, e.g. ‘mylogin@riseup.net’.
- Click the Next button.
Step Three: Server Information
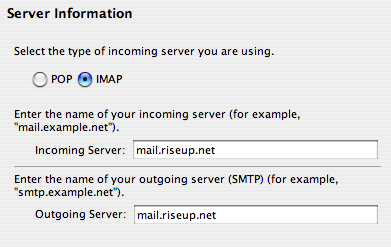
- Select ‘IMAP’ for type of incoming server.
- For incoming server, put ‘mail.riseup.net’.
- For outgoing server, things get a little complicated. If there is already an outgoing server configured, then the settings for this account will use that configuration. If you haven’t yet configured an outgoing server, enter ‘mail.riseup.net’ for now. It will not work, but will get us to the next question. For configuring the outgoing server, see below.
- Click the Next button.
Step Four: User Names
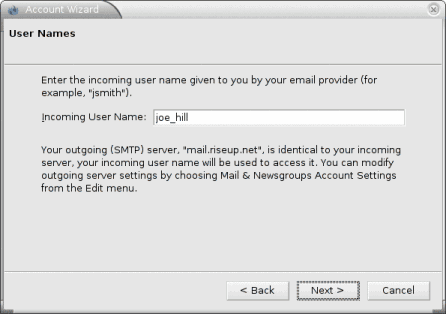
- For User Name, put your riseup.net mail login. For example, if you email address was mylogin@riseup.net, your user name would be ‘mylogin’.
- Click the Next button.
Step Five: Account Name
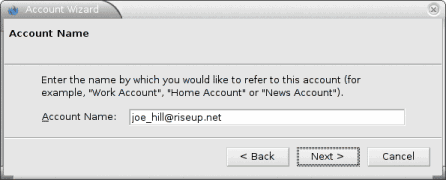
- For Account Name, put whatever you want. This will be the label attached to this account in the list of accounts which appears on the left side of the Thunderbird window.
- Click the Next button.
Step Six: Finish
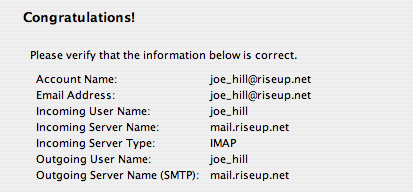
- Hit Finish. This new account will not be fully functional until you make some additional configurations. See the next step, below.
Configuring your IMAP Account
Open Account Settings
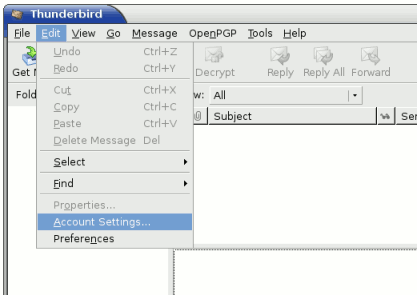
If the window Account Settings is not open, choose the menu item Tools > Account Settings… (if you have an older version of thunderbird, account settings might be under the Tools menu).
Server Settings
- Server Type: IMAP Mail Server
- Server Name: mail.riseup.net
- User Name: joe_hill
Security Settings
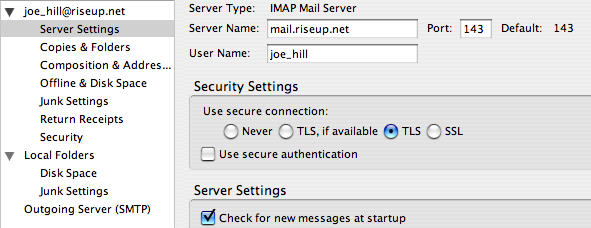
- Click on “Server Settings”
- Make sure you are using TLS and port 143 – riseup will not work with unencrypted connections! If port 143 doesn’t work, use 993 SSL.
- Use secure connection: TLS (or if port 143 doesn’t work, then use SSL)
- Use secure authentication: no! it will not work with this option checked.
If you have trouble, try using SSL and port 993.
Server Settings
- When I delete a message: Remove it immediately. This option will make deleting mail much faster than the other options. But don’t worry, even though you tell Thunderbird to delete the message immediately, it will still end up in your server-side Trash folder.
- Empty Trash on Exit: If you don’t want your deleted messages lingering around, then check this option. Otherwise, messages in the Trash are deleted after three weeks.
Copies and Folders
In this section, you have the option of using the Sent and Drafts folders which are stored on the server or the ones which are stored locally. It is up to you which one you decide to use. Choosing a local Sent folder usually makes it faster to send mail, but then you don’t have access to your sent mail when using the web mail interface.
Composition & Addressing
This section contains a few options for how you compose new mail.
- Compose message in HTML format: we suggest NO because not everyone can read HTML messages (especially those who are using screen readers due to difficulties seeing), but it is up to you.
Offline & Diskspace
This section will let you configure Thunderbird to keep a local copy of certain server-side folders. By doing this, you make it much faster to access and search the content of those messages. Thunderbird will then sync your data with the server when you make changes.- Make the messages in my Inbox available when I am working online: check this item.
Outgoing server (SMTP)
At the bottom of the list of accounts, you will see a section to add and configure SMTP servers.- Server Name: mail.riseup.net
- Port: 587
- Check the box that says “Use name and password”
- User Name: joe_hill (don’t put @riseup.net here)
- Newer versions of Thunderbird (version 3.0 and up) will have “Use secure authentication” here, do not check this box
- Older Thunderbird will have here “Use secure connection”, if you have this version, then choose TLS
- Newer Thunderbird will instead have “Connection security” drop down menu, choose STARTTLS
NOTE: If these settings are not exactly like this, you will not be able to send mail! If for some reason it doesn’t work, you can try port 465 with SSL instead of port 587 with TLS
Verifying Riseup’s Certificates
The first time you connect to Riseup, you should verify our certificate, to do this, click on “Examine Certificate.” Double check the fingerprints of your certificate is the same as the one we say it should be.
FIXME: How do you do this in Thunderbird? We don’t know!
If everything checks out, you are good to go!

